Set up your Account
Update your account information
Get started
Create a desktop shortcut for Clover PracticePay
Operating system: Clover PracticePayTM works best on a computer running Microsoft Windows. Integrations with the electronic medical record (EMR) do not work on Apple Mac computers.
Desktop shortcut: For direct access to Clover PracticePay, create a desktop shortcut. This shortcut is a browser link to the web-based portal to process payments and use the functions available in Clover PracticePay. Using the correct shortcut helps prevent errors and reduces delays when the software processes payments.
To create a desktop shortcut for Clover PracticePay:
1. On your desktop screen, right-click and then select New > Shortcut.
2. In the Create Shortcut window, paste the shortcut path that is relevant for your browser.
Edge:
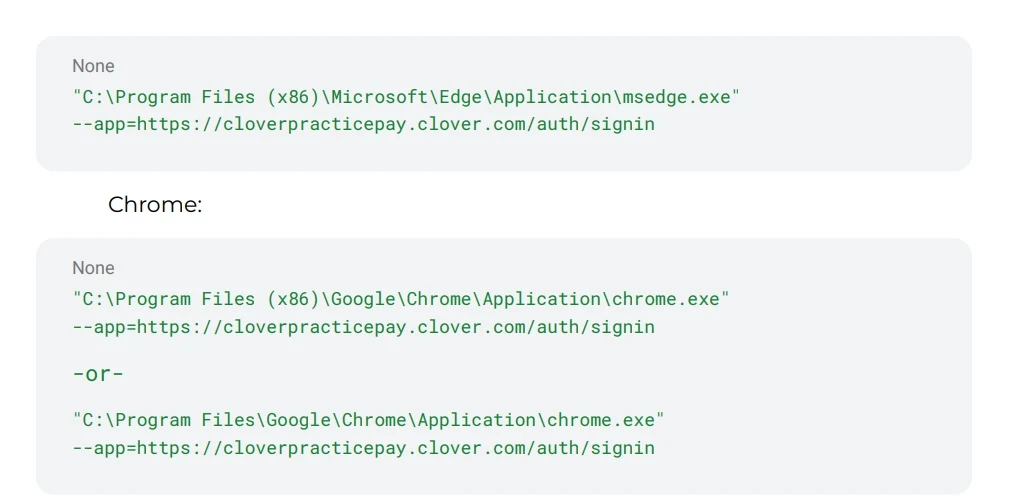
3. Select Next.
4. Enter Clover Clover PracticePay in the shortcut name generator.
5. Select Finish.
6. Navigate to your desktop.
7. Confirm that the Clover PracticePay shortcut is successfully created.
Log in as a first-time user
When your user account is created, you receive a Welcome Email with a link to set a password. You have a 72-hour window to use this link once it's sent. The link cannot be provided again if the 72-hour window has passed. If you did not create a password with the link during the timeframe, use the Forgot Password? link on the Login page. See Reset or Change Your Password for more information.
1. Select the link in the Welcome Email to create and confirm your new password.
2. On the Login page, enter your email address and password.
3. If you are the owner or office manager logging into Clover PracticePay for the first time, review and sign the following user agreements:
Clover Terms of Service & Privacy Policy
Clover PracticePay Payment Platform Terms of Service
Clover PracticePay Business Associate Agreement
4. Acknowledge these agreements before entering Clover PracticePay, and select Continue to Clover PracticePay.
Learn about the Business Associate Agreement (BAA)
Clover is committed to helping practices protect sensitive patient Protected Health Information (PHI). Both Clover and each practice share responsibility for keeping patient information secure.
The Business Associate Agreement (BAA) is a required agreement between Clover (the Business Associate) and practices using Clover services (the Covered Entities). The BAA confirms that all parties understand their responsibilities and will safeguard the security and integrity of PHI.
View your agreement record
User agreements are only applicable to the first person of the practice who logs in to Clover PracticePay. If you’re the first user from your practice to log in to Clover PracticePay, you need to review and sign the required agreements. If you’re not the first user, the agreements may already be completed for your practice. You can view signed agreements as follows:
1. Log in to Clover PracticePay.
2. Select your name in the top right corner.
3. Select Signed Agreements.
4. Review the details in the Signed Agreements table, including each agreement that was signed, along with the date and time.
5. Select Download to download signed agreements.
Log in as an existing user
1. Select the desktop shortcut to Clover PracticePay.
2. On the Login page, enter your email address and password.
3. Select Sign In or press Enter on your keyboard.
Reset or change your password
1. Select the desktop shortcut to Clover PracticePay.
2. On the Login page, select the Forgot password? link.
3. Enter your email address and select Submit. The password reset email is sent to the email address you use to log in to Clover PracticePay with.
4. Check your email for a password reset email and select the link in the email to confirm your new password.
5. Sign in using your new password.
Set roles and permissions
Clover PracticePay users who are assigned the role of Administrator (also known as Admin) can:
Manage user accounts
Assign the Admin role to other existing users
At the time of onboarding, two users are automatically created:
Owner Contact
Location Contact
Both the Owner Contact and Location Contact are assigned the Admin role by default. There is no limit to the number of Admins that can exist for an organization.
Create new users
Only Admin role users can create and manage other user accounts.
Log in to Clover PracticePay.
Select your name in the top right corner, and then select User Management > Create New User.
3. Enter the user’s first name, last name, and email address.
4. Select Save.
Assign role and account details for existing users
Log in to Clover PracticePay.
Select your name in the top right corner, and then select User Management.
Locate the user profile that you want to edit, and in the Action column, select Edit.
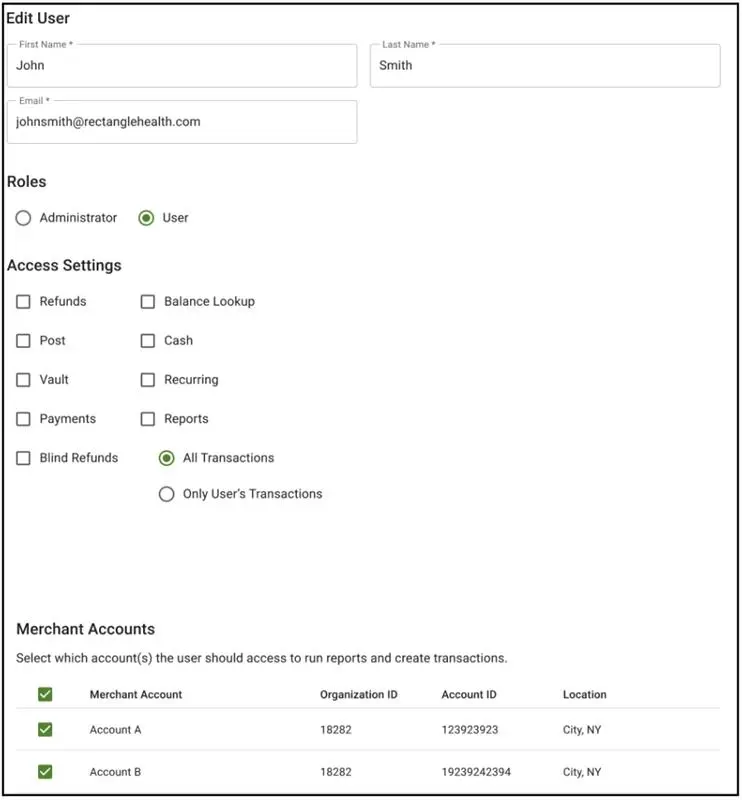
In the Roles section, select Administrator or User. Administrator users can create and manage other user accounts.
Adjust the default Access Settings as needed, depending on the features you want the user to access.
Payment: Take card-present payments on a Clover device and card-not-present payments on a Payments page. You can also take cash and online payments.
Refund: Refund settled transactions.
Void: Void transactions within 25 minutes of processing. After 25 minutes, the transaction will need to be refunded instead.
Post: Post payments to the patient ledger or other system or record.
Cash: Allow a user to work with cash payments.
Vault: Add cards to and run payments from the Vault (card-on-file).
Recurring payment: Set up recurring payment plans.
Patient Express: Send custom text messages, Text-to-Pay messages, and other actions in the Patient Express feature.
Report: View and export transaction information.
All Transactions and Only User’s Transactions: Allow a user to view and export all transactions across their Merchant Group or only the transactions that they have processed.
6. Select the locations (Merchant Accounts) to which the user is assigned, and then select Save.
New users receive an email containing a link to create a password and log in.
Edit role and account details for existing users
Only Admin role users can edit the role, access settings, and account affiliation of existing users.
1. Log in to Clover PracticePay.
2. Select your name in the top right corner, and then select User Management.
3. Locate the user profile that you want to edit, and then select Edit.
4. Edit the settings under Roles, Access Settings, and Merchant Accounts as needed.
5. Select Save.
Turn off user access
Only Admin role users can turn off Clover PracticePay access for existing users. Administrators cannot modify the status of their own account.
Log in to Clover PracticePay.
Select your name in the top right corner, and then select User Management.
Locate a user and turn off the toggle icon in the Enabled column.
Select Yes, Disable on the confirmation message. The user cannot access Clover PracticePay.
Enable user access
Only Admin role users can re-enable previous users to use Clover PracticePay.
1. Log in to Clover PracticePay.
2. Select your name in the top right corner, and then select User Management.
3. Locate the user you want to re-enable and turn on the toggle icon in the Enabled column.
Update your account information
Your Clover PracticePay user account details may need to be updated from time to time. You can request updates to:
Mailing address
Phone number
Email address
Additional personal or business information associated with your account
If you need to update any account information, contact Clover Support at (855) 280-4508 (Monday–Friday, 9 AM–8 PM Eastern Time). Keep your updated details ready when you call to help ensure a smooth process.