Use Vault for card-on-file and recurring payments
Use the Vault to save a card-on-file
Manage card-on-file
Take a payment from a card in the Vault
Card-on-file (Vault) FAQs
Set up and manage recurring payment plans
Learn about recurring payment plans
Manage recurring payment plan
Use the Vault to save a card-on-file
The Vault feature enables you to securely store a patient's encrypted credit card information for future payments, also known as card-on-file.
A card‑on‑file in Vault securely stores a patient’s encrypted credit card information in Clover PracticePay for future payments. It allows your practice to keep a card-on-file so you can process charges quickly and conveniently—whether for office visits, co‑pays, missed-appointment fees, repeat treatments, or recurring payments. Card information stored in Vault is encrypted, HIPAA‑compliant, and cannot be viewed by the practice, helping safeguard sensitive patient data while supporting faster, more efficient billing.
Vault use cases
The Vault feature allows your practice to securely store a patient’s encrypted card information for future payments. Card‑on‑file can be used in a variety of scenarios, including:
Office visits: Quickly charge patients for office visits or co‑pays without needing to swipe a card at each appointment.
No-shows or cancellations: Collect fees for missed or late‑canceled appointments when permitted by your policies.
Recurring payments: Run payments automatically for installment plans or other fixed‑amount arrangements.
Repeat treatments: Easily collect payments for ongoing or follow‑up treatments without requesting the card again.
Vault benefits
Practice benefits: Storing a card-on-file helps your practice:
Improve cash flow: Accelerate billing and collections, especially for recurring or repeat‑visit charges.
Enhance the patient experience: Provide a convenient, streamlined checkout process.
Maintain secure storage: Card information is encrypted, HIPAA‑compliant, and not viewable by the practice.
Reduce administrative burden: Automated billing reduces manual processing, paper invoicing, and follow‑up for outstanding balances.
Patient benefits: A card-on-file helps patients:
Pay conveniently: Store payment information for future visits or recurring payments.
Avoid late fees: Ensure timely payment processing.
Check out quickly: Reduce wait times at the point of service.
Stay protected: Benefit from advanced encryption and HIPAA‑compliant safeguards.
Best practices with patients
To help patients understand the value and security of saving their card in Vault, consider the following best practices drawn from Clover guidance:
Manage card-on-file for families: Allow one card to be used for all family members’ appointments for easier billing.
Incorporate card‑on‑file into practice policies: Include card‑on‑file as part of your cancellation or general financial policies, with the option for patients to opt out.
Store cards during in-person visits: Collecting the card and signature in person ensures a secure and seamless setup.
Use effective, confidence-building language: Ask, “Which card would you like to put on file?” instead of “Would you like to put a card on file?”
Reassure patients about security and privacy: Explain that their card details are encrypted and HIPAA‑compliant, and cannot be viewed by your practice.
Address concerns about high charges: Clarify that they set the Maximum Authorized Amount on the Pre‑Authorized Healthcare Form (PAHCF) and will receive notifications before charges are made.
Notify patients before charging the card: Always inform patients of the amount before processing a charge from a stored card.
Use the PAHCF for consent and protection: The PAHCF captures patient authorization for future or recurring charges and helps protect your practice in case of disputes. These forms are stored electronically.
Use the pre-authorized healthcare forms
When you store a patient’s card-on-file for recurring or future charges, the Pre-Authorized Healthcare Form (PAHCF) in Clover Clover PracticePay is used to capture the patient’s consent and may help protect against chargebacks. These forms capture information electronically and are kept on file for future reference.
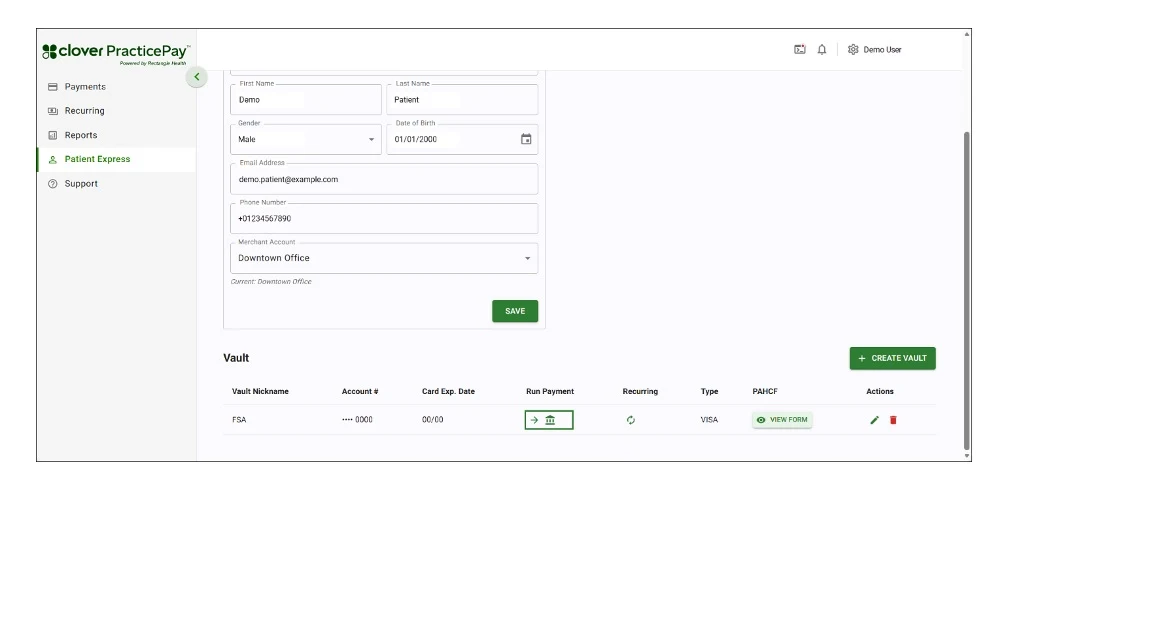
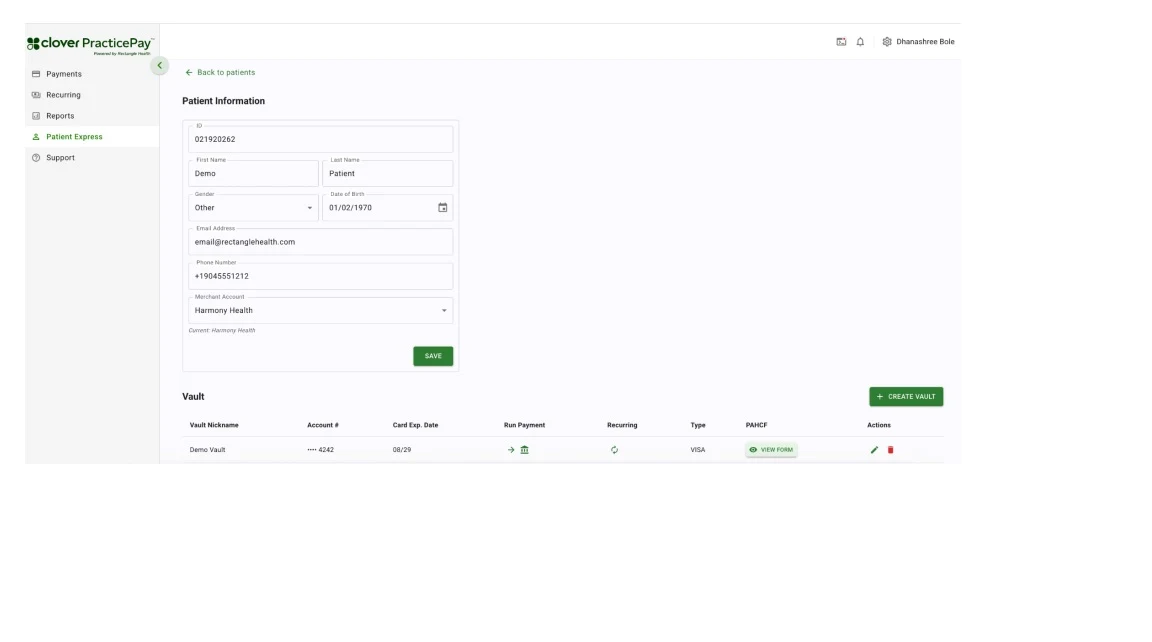
Manage card-on-file
Add a card to a patient’s Vault
1. Log in to Clover PracticePay.
2. From the left, select Patient Express.
3. Do one of the following:
New patient: Select Create New Patient and enter basic demographic data for your patient, including their name and phone number.
Patient already in Patient Express: Skip to the next step.
4. Search for the patient using their name or Patient ID.
5. Select Patient ID to view patient information.
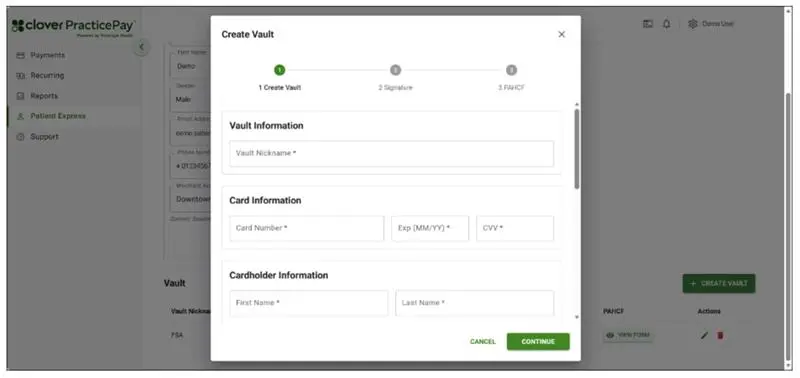
6. Select Create Vault.
7. Enter a vault nickname. Use a unique identifier, like "Debit” or “HSA”. If a patient wants to save multiple cards of the same type, use a suffix like "-1" and "-2" at the end of each Vault Nickname.
Note: Do not use special characters or spaces in the Vault Nickname. The only accepted characters are letters, numbers, dashes (-), and periods (.).
8. Enter the maximum authorized amount (maximum amount to be charged).
9. Select whether the maximum amount applies to:
All visits for the next 12 months. Select this option unless the card is being saved specifically for a single visit's balance. Otherwise, the PAHCF may not be valid for future visits. Example: If a patient's co-pay is $30 each visit, you could set the Maximum Authorized Amount to $30.00 and specify All visits for the next 12 months.
Charges related to this visit only. Example: If you plan to collect a post-insurance balance for a procedure, you could set the Maximum Authorized Amount to the post-insurance balance and select Charges related to this visit only. Note: The maximum amount you enter and the selection for "All visits for the next 12 months" or "Charges related to this visit only" are included on the Pre-Authorized Healthcare Form (PAHCF) that the patient signs.
10. Enter the card and cardholder information in the required fields.
11. Select Continue. A pop-up appears indicating whether the Vault was created.
If Vault Created Failed appears, select X or Close and try to create the Vault again.
If the Vault was successfully created, the cardholder is prompted for their signature on the Clover device connected to PracticePay. If Clover PracticePay is not connected to a Clover device, you can collect the cardholder’s signature on a printed PAHCF for your records in the next step.
12. Email receipt
Select the Email Receipt option.
Enter the recipient email address or addresses. Separate multiple emails with commas.
(Optional) Add a custom message above the default “Do-Not-Reply” text.
Select Send. A confirmation message appears once
the email is delivered.
Download PDF receipt
Select the Download PDF Receipt option to download a PDF file to your computer.
(Optional) If needed, open the PDF and print it or save it in another location on your computer for record-keeping. If Clover Clover PracticePay is not connected to a Clover device, you can collect the cardholder’s signature on this printed PAHCF.
13. Once you share the PAHCF, select Add Vault. A Vault Created Successfully message appears.
Edit a card-on-file in a patient’s Vault
You can edit the Vault Nickname, but it cannot match another vaulted card on the same patient.
1. Log in to PracticePay.
2. From the left, select Patient Express.
3. Search for the patient using their name or Patient ID.
4. Select Patient ID to view patient information.
5. Locate the card you want to modify in the Vault section, and then select the edit icon in the Actions column.
6. Edit the information, and then select Save. A Vault Updated Successfully message appears. A new Pre-Authorized Healthcare Form (PAHCF) is generated, and a new signature from the cardholder is requested on the Clover device connected to Clover PracticePay.
7. Email the new PAHCF and/or print a copy for the patient. If there is no Clover device connected to Clover PracticePay, you can get the cardholder’s signature on a printed copy of the PAHCF. The newly generated PAHCF overwrites the original when you edit the Vault record.
Delete a card-on-file from a patient’s Vault
1. Log in to PracticePay.
2. From the left, select Patient Express.
3. Search for the patient using their name or Patient ID.
4. Select Patient ID to view patient information.
5. Locate the card you want to modify in the Vault section, and then select the delete icon in the Actions column.
6. Select Yes, Delete. A Vault Deleted Successfully message appears, confirming the permanent removal of the card-on-file in Vault.
View and send the PAHCF for a card-on-file in the Vault
1. Log in to Clover PracticePay.
2. From the left, select Patient Express.
3. Search for the patient using their name or Patient ID.
4. Select Patient ID to view patient information.
5. Select View Form for the desired Vault. A View Plan Agreement pop-up appears with options on how to provide the PACHF to the patient.
6. Select one or both options:
Email receipt
Select the Email Receipt option.
Enter the recipient email address or addresses. Separate multiple emails with commas.
(Optional) Add a custom message above the default “Do-Not-Reply” text.
Select Send. A confirmation message appears once the email is delivered.
Download PDF receipt
Select the Download PDF Receipt option to download a PDF file to your computer.
(Optional) If needed, open the PDF and print it or save it in another location on your computer for record-keeping. If Clover Clover PracticePay is not connected to a Clover device, you can collect the cardholder’s signature on this printed PAHCF.
Take a payment from a card-on-file
1. Log in to PracticePay.
2. From the left, select Patient Express.
3. Search for the patient using their name or Patient ID.
4. Select Patient ID to view patient information.
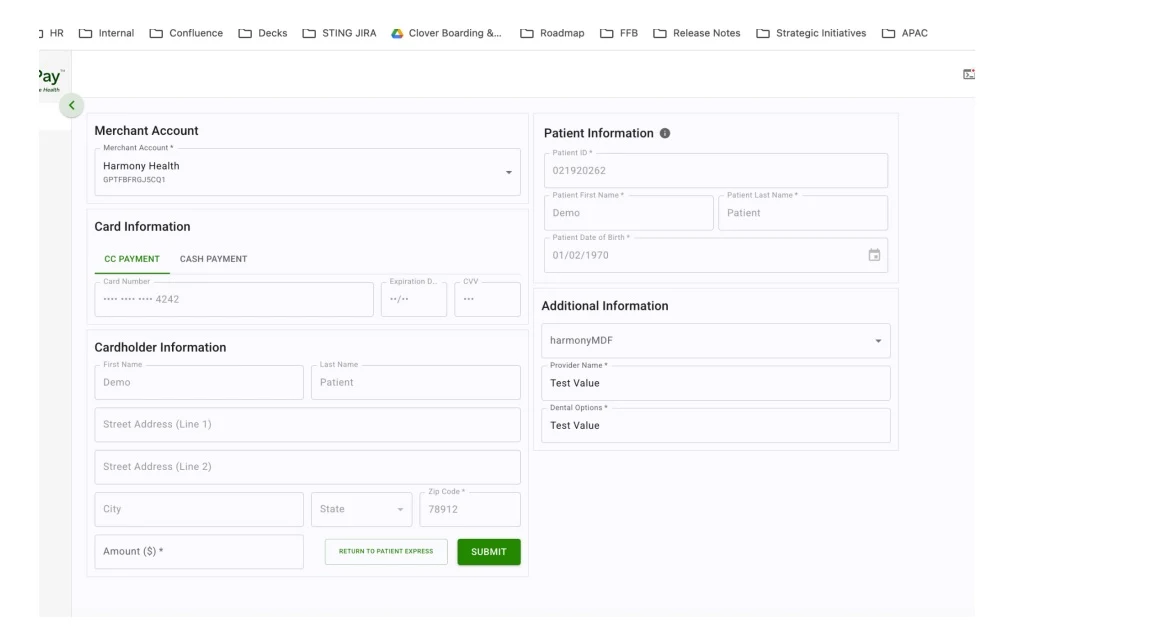
5. Locate the card that you want to charge in the Vault section, and then select the icon in the Run Payment column. The Payments page appears with the information from the Vault autopopulated in the respective fields. The Card Number field will only display the last four digits of the vaulted card.
6. Select your location, if your practice has more than one, and complete any Additional Information fields (if applicable).
Note: If you have any Merchant Defined Fields (MDFs), which are custom fields that allow you to track additional information on the transaction, they will appear under the Additional Information section.
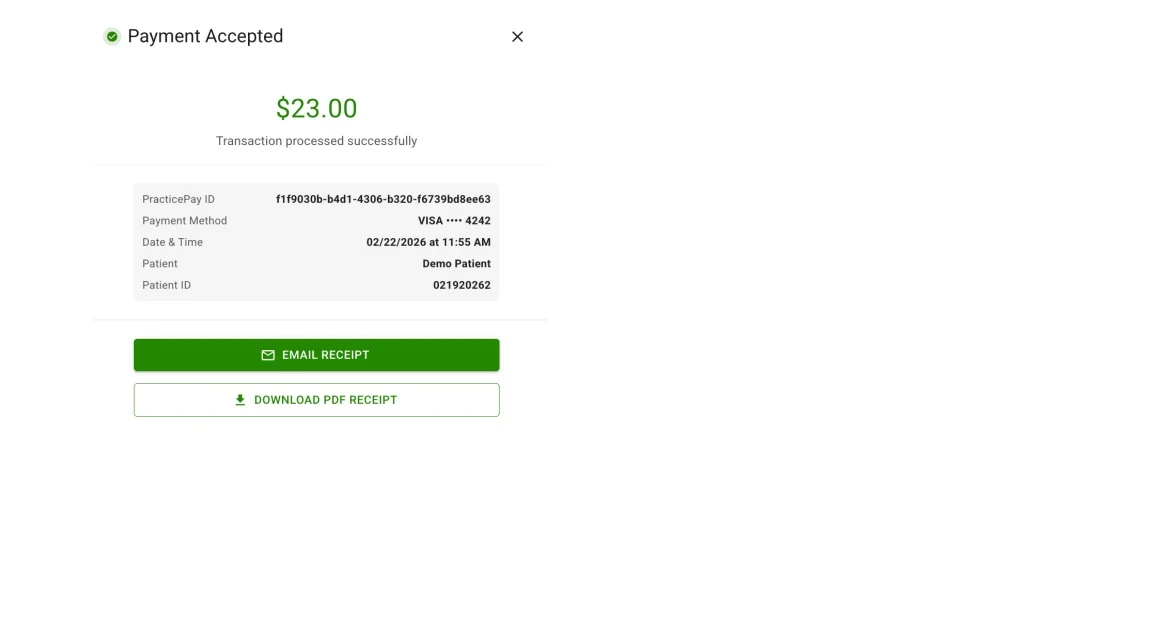
7. Enter the payment amount, and then select Submit.
8. On the Payment Accepted pop-up, choose how to provide the customer with a receipt. You can complete one, some, or all of the options.
Provide payment receipts
Email receipt
1. Select the Email Receipt option.
2. Enter the recipient email address or addresses. Separate multiple emails with commas.
3. (Optional) Add a custom message above the default “Do-Not-Reply” text.
4. Select Send. A confirmation message appears once the email is delivered.
Download PDF receipt
1. Select the Download PDF Receipt option to download a PDF file to your computer.
2. (Optional) If needed, open the PDF and print it or save it in another location on your computer for record-keeping.
Print to Clover device
Select Print to Clover Device to print a physical receipt with basic transaction details. A confirmation message appears after successful printing.
Card-on-file (Vault) FAQs
What are the best practices for the Vault Nickname?
Create a Vault Nickname that uses a unique identifier, like “Debit” or “HSA”.
Can multiple cards, such as an HSA, be stored in addition to a credit card?
Yes. For the Vault Nickname, use a unique identifier to differentiate between the patient’s stored cards. If a patient wants to save multiple cards of the same type, use a suffix like "-1" and "-2" for each card.
If I add a card-on-file to Vault, will it be charged automatically?
No, cards on file in Vault are only charged when you follow the steps to run a payment from Vault. If you want to set up automatic payments, you can create a Recurring payment plan from a card-on-file in Vault.
Is there a maximum amount and a year restriction?
For each card you store on file in Vault, you will set a maximum amount to charge per visit or per year. This information is included on the Pre-Authorized Healthcare Form (PAHCF) that you will share with the patient, and the PAHCF is valid for one year.
Is the signature on a PAHCF needed?
Yes, capturing the signature is important. It serves as proof of the cardholder's authorization, which can protect your practice against chargebacks and fraud if the charge is disputed.
How should I incorporate this feature with co-pays or insurance in general?
Use Vault to collect the amount the patient is responsible to pay after insurance. Ensure that the amount is within the Maximum Authorized Amount authorized by the PAHCF, and notify the patient before collecting the balance.
What happens if a card expires?
If a card expires, you will need to manually update it in the Vault in Clover PracticePay. For more information, see Edit a card-on-file in Vault.
Cards on file that are nearing their expiration can also be manually updated before their expiration date. To check if a patient’s card-on-file is close to expiring, you can look up the patient in Patient Express and view their Vault record(s).
Can an email address be stored with a card-on-file in Vault?
No, an email address cannot be stored in the Vault record.
Set up and manage recurring payment plans
Recurring payments give practices a simple way to offer flexible, predictable payment options. These plans help patients manage their healthcare expenses over time, while supporting your practice’s ability to collect balances efficiently. By allowing patients to make smaller, scheduled payments, you increase the likelihood of collecting in full, especially for larger medical bills.
Recurring payment options, such as payment plans, memberships, and installments, are widely expected in many service industries. Promoting these options on your website, in social media, and in your office helps encourage patients to pursue necessary care rather than delaying treatment due to cost concerns.
Benefits of recurring payments
Recurring payment plans give your practice a simple, predictable way to collect balances while offering patients flexible pay‑over‑time options. Benefits include:
Increased collections and predictable revenue: Scheduled payments help ensure timely and complete balance recovery.
Terms set by your practice: You define the amount, frequency, and duration of the plan.
Greater patient satisfaction and loyalty: Flexible payment options help patients access the care they need.
More referral opportunities: A positive financial experience can increase patient trust and word‑of‑mouth referrals.
Guide patients about recurring payments
Use the following best practices when discussing recurring payments with patients:
Be transparent about costs: Clearly explain what the patient will owe after insurance.
Offer flexibility: Provide an affordable, secured payment plan that fits the patient’s budget.
Build trust: Reassure patients that their stored card will only be used as outlined in the Recurring Payment Plan Agreement.
Highlight security: Explain that payments are encrypted and handled with strict security measures to help prevent fraud or misuse.
Support your team: Encourage staff to focus on patient care by using recurring plans to streamline billing.
Learn about recurring payment plans
Recurring payment plan types
When creating a recurring payment plan, you can choose between two plan types:
By Balance Due
This plan type automatically calculates each installment amount based on the total balance and the number of payments the patient will make. Use this plan type when the total balance is uneven. The system will apply a larger first payment, and the remaining payments will be evenly divided across the schedule.
By Installment Amount
This plan type allows you to define the installment amount and the number of installments. Use this plan type:
When the total balance is an even amount.
To collect one future payment.
To collect membership dues, packages, or subscription‑based fees on a weekly or monthly schedule.
Recurring payment plan status
Recurring payment plans can display one of the following statuses:
Active: The recurring payment plan is running as scheduled.
Failed: The most recent scheduled payment was declined. See Identify Failed Recurring Payments for next steps.
Inactive (Payment Schedule Finished): All scheduled payments have been processed, and the plan has ended. Some payments in the plan may have failed. Inactive plans are excluded from the Total # of Plans column.
Removed: The recurring payment plan has been disabled by a user. See Remove a recurring payment plan for details. Removed plans are excluded from the Total # of Plans column.
Complete: The recurring payment plan has no remaining balance and or payments due.
Recurring Payment Plan Agreement
When you create a new recurring payment plan, Clover PracticePay generates a Payment Plan Agreement. This document outlines the terms of the plan for both patient consent and your records. The Payment Plan Agreement is separate from the Vault’s Pre‑Authorized Healthcare Form (PAHCF), reducing dependencies between the two features and providing greater system flexibility.
To view, email, or print a Payment Plan Agreement after a plan is created, see the View, Email, and/or Print the Recurring Payment Plan Agreement section.
Manage recurring payment plan
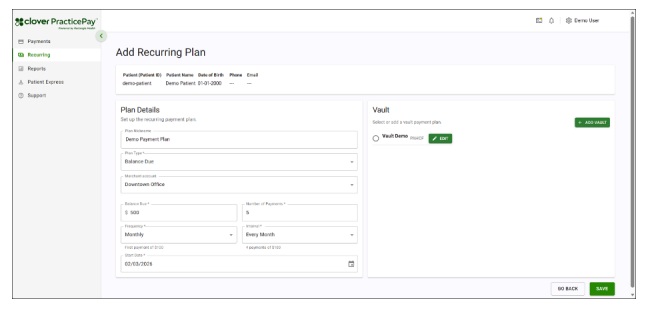
Create a recurring payment plan
1. Log in to PracticePay.
2. From the left, select Recurring.
3. Select Add Recurring Plan.
4. Do one of the following:
New patient: Select Create New Patient and enter basic demographic data for your patient, including their name and phone number.
Patient already in Patient Express: Skip to the next step.
5. Select Continue.
6. Under Plan Details, enter a plan nickname and select the Plan Type: By Balance Due or By Installment Amount.
7. If your practice has more than one location, select the Merchant Account.
8. Enter the plan‑specific payment information.
By Balance Due
i. Enter the full balance due.
ii. Enter the number of payments to divide the balance across
Note: If the balance is uneven, the first payment will be larger, and the remaining payments will be divided evenly.
By Installment Amount
i. Enter the installment amount that will be paid in each installment.
ii. Enter the number of installments required to cover the full balance due. Enter 0 for indefinite payments.
9. Configure the payment schedule for either of the recurring payment plans.
Select the Frequency (Weekly or Monthly).
Select an Interval:
Every week/month
Every two weeks/months
Every three weeks/months
Every four weeks/months
Select a Start Date:
By Balance Due: Payments can begin as early as the next day.
By Installment Amount: Payments may begin on the same day the plan is created. Example: You can schedule payments to run every other week on Thursdays, or every other month on the third day of the month.
10. Select or add a card-on-file in Vault for the payment plan.
If there are existing cards on file in Vault, select from the available option(s). Identify the type of card by the Vault Nickname. If needed, you can edit the card-on-file information.
If there are no cards on file in Vault, select Add Vault and complete the steps to add a new card-on-file.
11. Review that all entered plan details are correct, then select Save. A Confirmation pop-up appears with a summary of the Recurring payment plan details and information on the selected Vault.
12. Review the summary of the plan and Vault information, then select Continue to initiate the signature request on the Clover device.
13. Wait for the patient to provide their signature on the Clover device, if connected. When the signature is captured, select Continue. If Clover PracticePay is not connected to a Clover device, you can collect the signature on a printed Recurring Payment Plan Agreement for your records.
14. Share a copy of the Recurring Payment Plan Agreement with the cardholder by emailing or printing it. You may select both sharing options (Print to PDF and Email). Then, select Confirm. See View, Email, and/or Print the Recurring Payment Plan Agreement.
Search for recurring payment plans
1. Log in to Clover PracticePay.
2. From the left, select Recurring.
3. Select a Merchant Account ID and the location, if there is more than one.
4. Enter the patient's name.
5. Select Search.
6. From the search results, locate the patient whose plans you want to view.
7. Review the summary of the patient’s Recurring payment plans in the Total Number of Plans, Total Amount Due, and Total Remaining Balance columns.
8. For an expanded view and more details of a patient’s plan, select the arrow to the left of the Patient ID column. Under the expanded view, the available details include: Type, Frequency, Account Holder, Start and End Date, Method, Status, Plan Amount, Remaining Balance, Plan Nickname, and Actions to view, edit, and remove plans.
Edit a recurring payment plan
If you want to edit both plan and card-on-file details, we recommend editing the selected card-on-file in Vault first.
1. Complete the steps to search for recurring payment plans.
2. Select the arrow next to the patient’s recurring plan. An expanded view of the patient’s plans appears.
3. Select the three vertical dots in the Actions column for a plan and then select Edit Plan.
4. Edit the information as follows:
a. Details of the selected card stored in Vault as the payment method. You can change or update the card details for an existing Vault record. For more information on the steps, see Edit a card-on-file in a patient’s Vault. Important! You cannot change to a different card stored in Vault; you can only edit the card already selected for the existing Recurring payment plan.
b. Plan Nickname.
c. Frequency, such as Weekly or Monthly.
d. Interval, such as every week, every month, every 2 weeks, every 2 months.
5. Select Save. A Confirmation pop-up appears with a summary of the Recurring payment plan details and information on the selected Vault.
6. Review the summary of the plan and Vault information, then select Continue to prompt the signature request on the Clover device.
7. Wait for the patient to provide their signature on the Clover device, if connected. When the signature is captured, select Continue. If Clover PracticePay is not connected to a Clover device, you can collect the signature on a printed Recurring Payment Plan Agreement for your records.
8. Share a copy of the Recurring Payment Plan Agreement with the cardholder by emailing or printing it. You may select both sharing options (Print to PDF and Email). Then select Confirm. See View, Email, and/or Print the Recurring Payment Plan Agreement.
Remove a recurring payment plan
When a Recurring payment plan is removed, it is permanently disabled and is no longer used for further payments. Removing a Recurring payment plan cannot be undone.
Best practice: Remove a Recurring payment plan at least one day before the next scheduled payment to prevent it from being processed.
1. Complete the steps to search for recurring payment plans.
2. Select the arrow next to the patient’s recurring plan. An expanded view of the patient’s plans appears.
3. Do one of the following:
Select the three vertical dots in the Actions column for a plan and then select Remove Plan.
Select View in the Actions column, and then select Remove Plan in the bottom right corner of the Payment Plan Details screen.
4. Select Yes, Remove Plan on the confirmation pop-up. The recurring payment plan’s status changes to Removed. The Removed status will exclude it from the Total # of Plans column for the patient.
View, Email, and/or Print the Recurring Payment Plan Agreement
A Recurring Payment Plan Agreement is generated when you set up a recurring payment plan. You can view, email, and/or print the Recurring Payment Plan Agreement when it is generated and also afterwards.
1. Complete the steps to search for recurring payment plans.
2. Select the arrow next to the patient’s recurring plan. An expanded view of the patient’s plans appears.
3. Find the plan for which you want to view or share the Payment Plan Agreement, and select View in the Actions column.
4. Select View Plan Agreement in the upper right corner.
5. Share a copy of the Payment Plan Agreement with the cardholder by emailing or printing it. You can select both sharing options (Print to PDF and Email). Then select Confirm.
If you send an email and there are multiple recipient email addresses, separate them with a comma.
If you print the Payment Plan Agreement and Clover PracticePay is not connected to a Clover device, you can collect the cardholder’s signature on this printed copy.
Email the Recurring Payment Plan Agreement:
1. Enter the recipient email address(es). If there are multiple addresses, separate them with a comma.
2. Enter a subject for the email.
3. Select Email. The pop-up indicates the status: Sending Email… while sending the email, Email Sent after the email has been sent, and Error if the email cannot be sent.
Print the Recurring Payment Plan Agreement:
1. Select Print.
2. Wait for the Browser Print pop-up to appear.
3. Format as desired, then select Print.
Turn on recurring payment notifications
You can turn email notifications for Recurring payments on or off, and you can also specify the email address that will receive notifications. To manage Recurring payment email notifications, contact Clover Support at (855) 280‑4508 (available 9 AM–8 PM Eastern Time).
Identify failed recurring payments
Recurring payments run every hour. Run a daily report of all Recurring payment plans to identify any declined Recurring payments.
1. Log in to PracticePay.
2. From the left, select Recurring.
3. Search for a specific plan by entering the Merchant Account, if there is more than one location, and the patient name, then select Search.
4. In the search results, review the Total Remaining Balance column. An alert icon (a red exclamation mark) next to the amount indicates the Recurring payment plan(s) failed.
5. For an expanded view and more details on a patient’s plans, click the arrow to the left of the Patient ID column. If the patient has multiple plans (as indicated by the Total # of Plans column), this step will help you determine which plan(s) failed.
6. In the expanded view, review the Status column to identify the plans that have failed. A failed plan will have a Failed status.