Use Reports and post payments
Generate a Transaction Search report
View and export reports
The following reports are available in Clover PracticePay.
Transaction Search report
With the Transaction Search report, you can:
Search for transactions.
View transaction details.
Post payments with click-to-post (if you post payments to an electronic record).
Refund payments.
Void payments.
Email or download receipts.
Print receipts.
Print or export your transaction search results as a CSV or XLSX file.
Text-to-Pay report
The Text‑to‑Pay report provides visibility into each Text‑to‑Pay message you send, including full details on message status and delivery success. With the Text‑to‑Pay report, you can:
Track sent messages with real‑time status and success details.
Review whether patients have opted in or out of text messaging using the Consent Status report.
Print or export your transaction data for your records or reporting needs.
Consent Status report
The Consent Status Report shows whether a patient has opted out of text messaging. You can find it under Reports > Text-to-Pay Reports. Patients appear in the report after they receive a Clover PracticePay message—either a custom text or a Text‑to‑Pay message.
Consent Status displays as:
–: A message is sent, and the patient has not opted out.
Opted‑Out: The patient replied “Stop” or another cancel keyword to opt out of future messages.
Opted‑In: A previously opted‑out patient replied “Start” to opt back in.
Consented: The patient has provided consent to receive messaging.
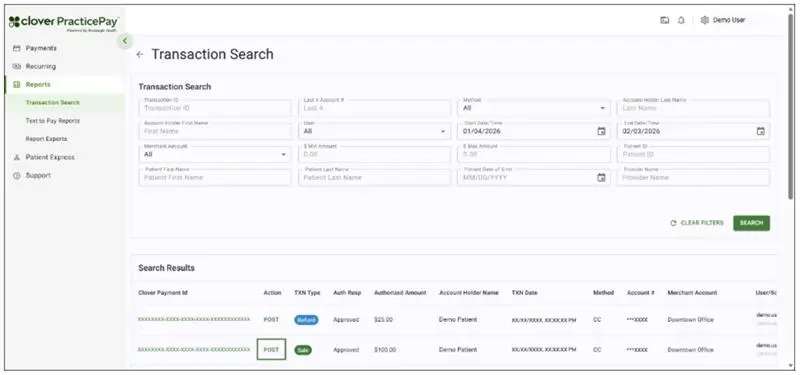
Generate a Transaction Search report
Log in to Clover PracticePay.
From the left, select Reports > Transaction Search.
(Optional) Use the search filters to narrow down the results of the transaction search. To remove all search criteria, select Clear Filters.
Select Search. Transactions are displayed in the Search Results table. You can include up to 999 transactions per report.
Review the Total Amount in the bottom left corner for the total sum of all the transactions in the search results.
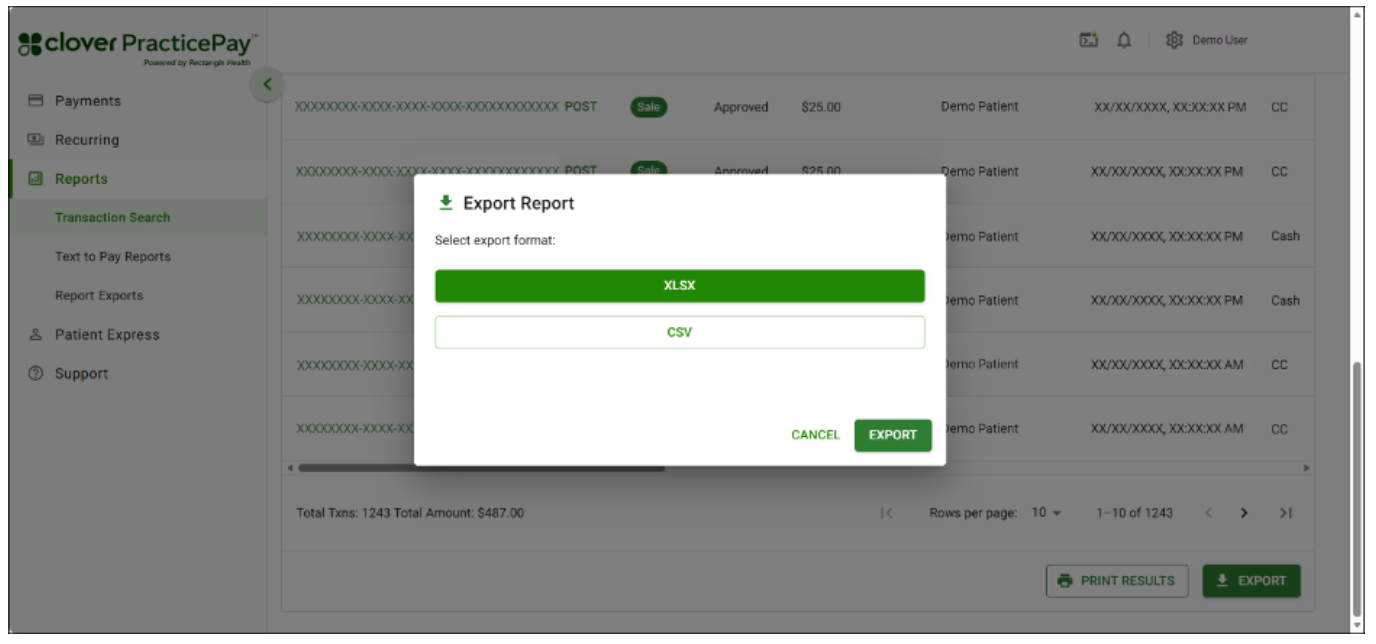
Select Export
and choose the file type for the report export (CSV or XLSX).
If the report contains fewer than 1,000 transactions, you can save it to your computer.
If the report has more than 1,000 but fewer than 50,000 transactions, it will begin generating. You receive a notification in Clover PracticePay when the report is ready, and it is available within Reports > Report Exports.
If the report has more than 50,000 transactions, you receive an error message, and the report does not generate.
Track text-to-pay payments
Log in to Clover PracticePay.
From the left, select Reports > Text-to-Pay Reports. The Transaction Reports – Text-to-Pay screen displays 10 Text-to-Pay records per page and provides real-time details, including:
Patient ID
Patient Name
Patient Phone Number
Date & Time Sent
Delivery Status
Balance Amount
Paid Amount
Message Status
Date & Time Opened
Time to Open
TXN ID
Method
Delivery status and related information
After a message is sent, the Delivery Status options are:
Delivered: For successful messages
Undelivered: For messages that fail for any reason
Sending: For messages still in the queue to be sent
When a patient taps the Online Bill Pay link in the Text-to-Pay message, the following information appears in the table:
The Message Status changes from blank (–) to Opened.
The date and time the Online Bill Pay link was tapped.
The time it took the patient to tap the Online Bill Pay link.
When a patient pays online through the Online Bill Pay link, the following information appears in the table:
The Message Status changes from Opened to Paid.
The amount the patient paid.
The Payment ID.
The payment method.
Export reports
You can export a report as a plain text Comma Separated Value (CSV) file or a Microsoft Excel (XLSX) file. You can view your previous report exports (up to 7 days from the date the report was exported).
Log in to Clover PracticePay.
From the left, select Reports and then select the report you want to generate.
Select Export.
4. Select a file format: CSV or XLSX.
If the report contains fewer than 1,000 records, it downloads
immediately.
If the report has over 1,000 records, wait for the email or in‑app notification to download it. You receive an email with a download link. When the email arrives, select the download link:
If you’re logged in, a notification appears in the upper-right corner, and the file downloads immediately.
If you’re not logged in, the link opens the login page, and you need to sign in.
Post payments
Clover PracticePay posts payments into any PMS, EMR, or EHR system. We offer Passive Integrations (posting scripts). With this setup, payments are automatically posted into your system—no manual entry required. This method works seamlessly with any platform and is highly customizable.
Regardless of the system your practice uses, whether it's a PMS, EMR, EHR, or an integrated platform, our posting tools are built to save time, improve accuracy, and reduce administrative overhead.
Learn about our systems
Healthcare practices rely on various software systems to manage daily operations, patient records, and billing activities. Here are three common terms you may encounter:
Practice Management Systems (PMS): Manages the administrative and financial aspects of a healthcare practice, like scheduling, billing, and reporting. Examples include Dentrix, OpenDental, AthenaCollector, and NextGen.
Electronic Medical Records (EMR): Digital version of a patient chart used within a single practice. It focuses on clinical documentation such as history, diagnoses, and medications.
Electronic Health Records (EHR): Similar to an EMR, but is designed for sharing information across providers. EHRs support broader care coordination and include more comprehensive patient data. While some EMRs and EHRs may display limited financial data, most payment posting and balance management happen in the PMS.
Combined systems: Many healthcare practices use platforms that combine PMS and EHR functionality into a single system.
Automated posting of transactions with Clover PracticePay Windows Agent
The Clover PracticePay Windows Agent is a component that runs scripts that help automate the posting of transactions directly into an organization’s practice management system’s (PMS) ledger. To process payments and take full advantage of Clover PracticePay, the Clover PracticePay Windows Agent will likely need to be installed on your computer.
Minimum installation requirements
Operating system:
Windows Server 2012 or
Windows 10 (desktop)
Before you begin
To ensure posting works as expected, follow these best practices:
Make sure you’re starting from the correct screen or field before charging or posting a transaction.
Enter all required information during the transaction so the system has the data it needs to post correctly (for example: Patient First Name, Patient Last Name, and Patient ID/Account Number).
If you use a web‑based practice management system (PMS), open Clover PracticePay and the PMS in two separate browser windows, not in different tabs of the same window.
While posting is in progress, avoid using the mouse or keyboard, as this can interrupt the posting process.
Troubleshooting and support
To troubleshoot Clover PracticePay Windows Agent or payment posting issues, see the Troubleshoot payment posting issues.
For help with Clover PracticePay Windows Agent installations and posting payment questions, contact Clover Support at (855) 280‑4508 (available 9 AM–8 PM Eastern Time).
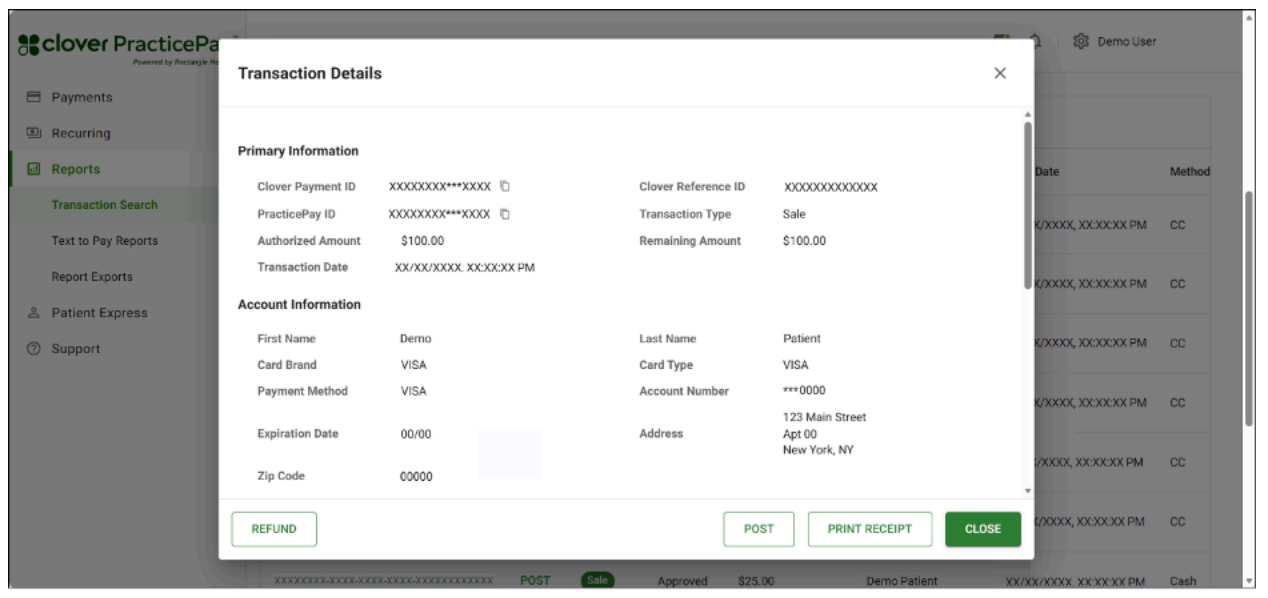
View transaction details on the Transaction Search report
Log in to Clover PracticePay.
From the left, select Reports > Transaction Search.
Enter search criteria and select Search.
Select the Payment ID for any payment in the Search Results section.
On Transaction Details, you can:
Refund payments when the transaction has settled.
Void payments when the transaction has not settled.
Access the receipt to print it.
Post payments to your Practice Management System (PMS).
Read and understand transaction details
The Transaction Details screen provides various types of information about a specific transaction, such as a credit card charge to a patient, in Clover PracticePay. Transaction details are useful for reviewing charges made to a patient and the card used to process the payment.
Primary Information
Clover Payment ID: Clover Gateway TXN ID.
Clover PracticePay ID: Use to locate and manage specific transactions. Also known as the Clover PracticePay TXN ID.
Transaction Type: Use to determine if the transaction was a sale, void, or refund:
Auth Only: Authorization was collected, but the patient has not been charged.
Sale: Patient was charged.
Void: Patient’s transaction was voided.
Refund: Patient was provided a refund.
Decline: Transaction was declined, and the patient was not charged.
Authorization Response: Response from the issuing bank of the cardholder showing an approval or a decline.
Authorized Amount: Amount the customer transmits to the credit or debit card processor to make sure the patient has the funds required to make the transaction.
Requested Amount: Amount the customer requested from the patient during the time of the transaction.
Transaction Date: Date of the transaction.
If a charge is refunded, then the refund will be a separate transaction with its own time stamp.
If a charge is voided, then the void is reflected as an update to the original transaction. There will not be a separate transaction for it.
Account Information
First Name and Last Name: Name of the cardholder/patient.
Card Brand and Card Type: Card brand company that issued the card
Examples: Visa, Mastercard, Amex, Discover.
Account Type: Holder type:
P: Personal Account
O: Organization Account
Account Number: Last 4 digits of the card number used for the transaction.
Expiration Date: Card expiration date.
Billing Address and Billing Zip Code: If entered, these are the address associated with the card.
Authorization Information
Authorization Code: System-generated code used as an authentication factor received from the issuing bank of the card.
AVS Response and AVS Response Codes: Provides detailed information on address verification.
Settlement Information
View information on the Closeout app on your Clover device or log into the Commerce Control Center website for all settlement details.
Source Information
Merchant Account: Identifies which merchant account the transaction is associated with
User: Identifies the user who completed the transaction. Provides information on how a transaction was transmitted.
Online transactions are identified as "onlinepatientpayment".
Recurring transactions are identified as "rbsystem".
User Email Address: Email address of the user who completed the transaction. Provides information on how a transaction was transmitted. Note: Online or recurring transactions do not have an associated email address and display as “n/a” or “not applicable”.
Entry Method: Indicates how the transaction was entered. For Online Bill Pay and recurring transactions, the entry method will be KEYED.
KEYED
EMV_CONTACTLESS
EMV_CONTACT
SWIPE
Source IP: IP address of the device or network the transaction was run on
Post Payments
Click-to-Post from the Transaction Search report
If you have a click-to-post integration that doesn't post the payment automatically, there are manual steps you can take to post a payment from Transaction Search instead.
Log in to Clover PracticePay.
From the left, select Reports > Transaction Search.
Enter search criteria and select Search.
Confirm that the associated patient ledger is open in your practice management system (PMS) or electronic health record (EHR).
To post the payment, do one of the following in the Search Results section:
For a transaction, select Post in the Action column.
For a transaction, select the Payment ID number, and then select Post on the Transaction Details pop-up.
The payment is automatically posted to the patient ledger.
Post Text-to-Pay payments
With the patient ledger open in the background:
Log in to Clover PracticePay.
From the left, select Reports > Transaction Search.
Enter search criteria and select Search. For the best results, select Online Patient Payment as the User search filter to return online payments (which include Text-to-Pay payments).
Select the Payment ID number to open the transaction details summary.
Select Post while the patient ledger is open within your PMS.
View posting status and details
After a payment is posted, posting details are displayed in two places:
In the Posted By and Posted On columns of the Search Results of Transaction Search. To access Transaction Search, select Reports > Transaction Search. Narrow down the search results by searching with filter options.
At the bottom of the Transaction Details pop-up screen. To access Transaction Details, select Reports > Transaction Search > scroll to the Search Results and select a Payment ID to view the transaction details.
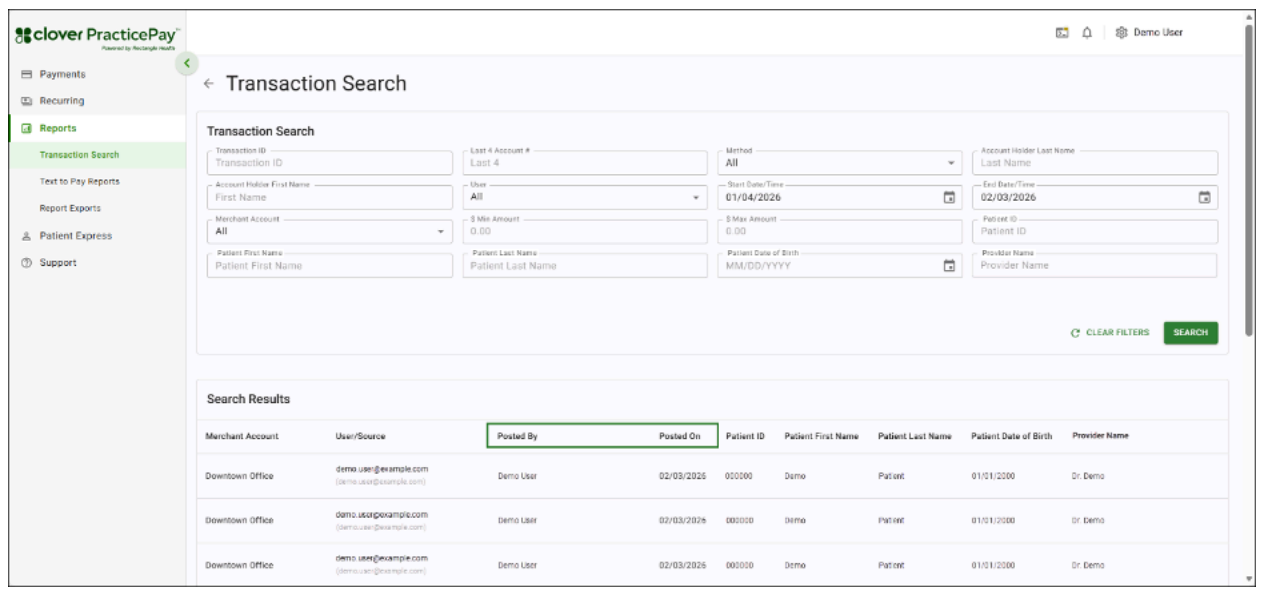
If a payment has not been posted, a dash (-) is displayed in the Posted By and Posted On columns, and posting information is not displayed at the bottom of Transaction Details.