Manage patient information
Send custom and payment-related messages to your patients
Manage patient information
Patient Express is a feature in Clover PracticePay that supports patient engagement and communication by enabling healthcare practices to send custom, one‑way text messages, collect digital forms, and facilitate text‑to‑pay options.
If you do not see Patient Express in the left menu of Clover PracticePay, contact your practice administrator or contact Clover Support at (855) 280‑4508 (available 9 AM–8 PM Eastern Time).
Search for patients in Patient Express
Log in to Clover PracticePay.
From the left, select Patient Express.
Search for a patient by Patient ID or first or last name.
From the search results, you can:
Select the Patient ID to open the patient’s record. You can edit the patient information or add a card-on-file.
Select Text-to-Pay to send a text-to-pay message or custom text message to the cellphone number associated with the patient record. Note: If a patient opts out of text messaging, the Text-to-Pay link is not available.
Add a patient in Patient Express
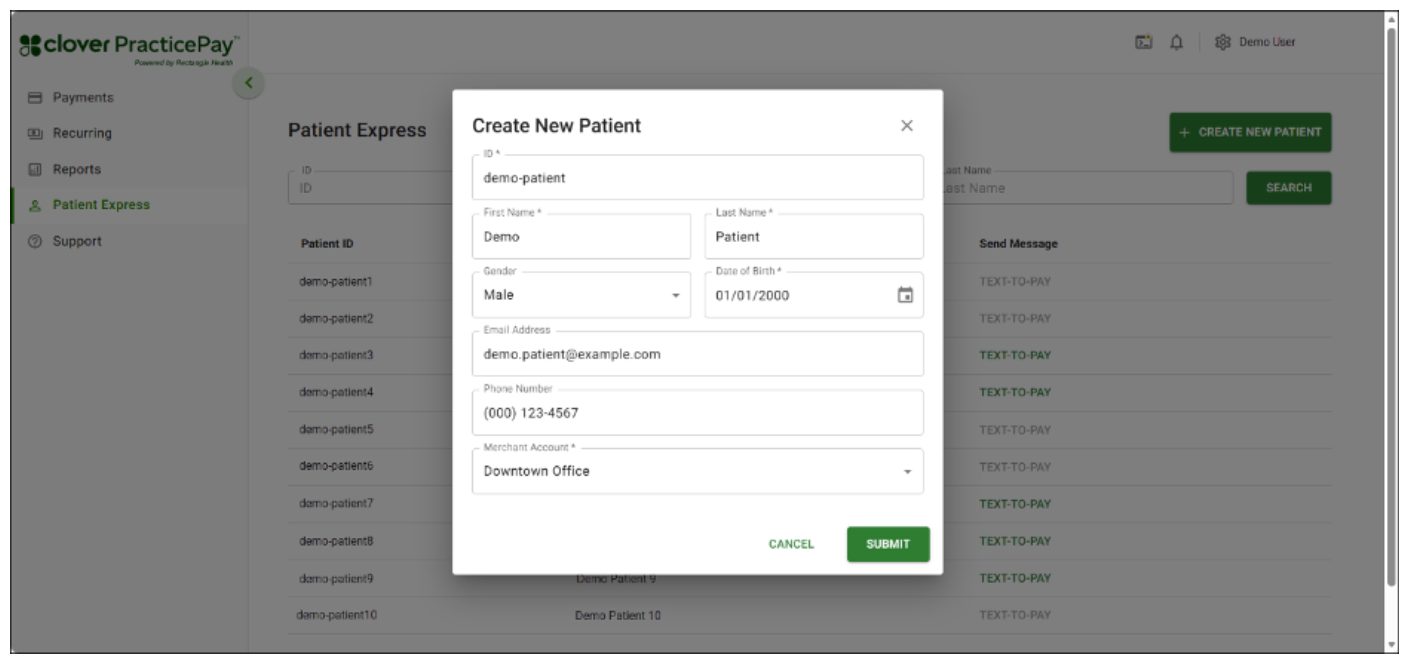
Before you can send patients a custom text message, a text-to-pay message, or to add a card to a patient’s Vault, you must add them to Patient Express.
If your practice receives Virtual Credit Card (VCC) claims payments, we recommend creating patient records in Patient Express for these payers.
Log in to Clover PracticePay.
From the left, select Patient Express.
Select Create New Patient.
Enter the following required information:
Patient ID—Use the same Patient ID that appears elsewhere in Clover PracticePay. As a best practice, use the same ID assigned to the patient in your practice management system (PMS) or electronic medical record (EMR) to maintain consistency across systems. Learn about our systems.
If creating a record for a VCC claims payment payer, enter the insurance’s name, Payer ID, or other indicator.
First Name—Enter the patient’s first name.
If creating a record for a VCC claims payment payer, enter the payer’s company name.
Last Name—Enter the patient’s last name.
If creating a record for a VCC claims payment payer, enter the payer’s company name.
Enter the following optional information:
Date of birth
Gender
Phone Number—Enter a mobile number to send Text-to-Pay and custom text messages. As a best practice, enter a mobile number rather than a landline, as landlines cannot receive text messages.
If creating a record for a VCC claims payment payer, you do not need to enter a phone number.
Email Address
Select Submit.
Edit a patient record in Patient Express
Log in to Clover PracticePay.
From the left, select Patient Express.
Select the Patient ID.
Edit the patient details, and then select Save.
Bulk-upload patient records in Patient Express
Use Bulk Upload in Patient Express to add multiple patients at once. You can download the Bulk_Patient_Upload_Template file, enter your patient information, and upload it to update your database. Supported file types are CSV, XLS, or XLSX. The maximum file size is 2MB or 10,000 patient records.
Before you begin
Note the following:
The Bulk Upload function overwrites the existing patient database. New patient records are added, and existing patient records are updated.
Clover PracticePay does not allow multiple patients to share a Patient ID. When you use Bulk Upload, existing Patient ID records are updated using the information included in your Bulk Upload file.
Bulk upload patient records
Log in to Clover PracticePay.
From the left, select Patient Express.
Select Bulk Upload.
Select Download Template to download and save the Bulk_Patient_Upload_Template file.
In the template file, enter patient information in the following columns:
Patient ID (required)
First Name (required)
Last Name (required)
Gender (Male, Female, or Other)
Date of Birth (MM/DD/YYYY) (optional)
Email (optional)
Mobile Phone (optional)
Save the template file with the patient records.
In Clover PracticePay, on the Bulk Upload Patients pop-up, select a merchant account.
Upload your file by dragging and dropping it into the pop-up, or select the Click to upload link and select your file. If processing is successful, a message indicates your file is ready to import.
Select Import after the file is processed successfully. If you leave the page during the import process, once the import is complete, you receive a notification alert. Note:
If processing results in a warning message, it indicates how many new records will be added and how many existing records will be updated. You can download the preview file to fix missing information (such as 'First Name - Required'), or approve and proceed as-is.
If processing fails due to the file type, ensure your file is in the correct format (CSV, XLS, or XLSX), is no larger than 2MB, and contains a maximum of 10,000 records.
If processing fails due to a timeout, check your internet connection and try again. To resolve, remove the file and re-upload it with the correct format. If necessary, re-download and complete the template.
(Optional) Download the import report within 7 days of the bulk upload of patient records.
If you were on the page during the import process, select the Download link on the Bulk Upload Patients pop-up.
If you navigated away from the page during the import process, select Reports > Report Exports, or select the Report Exports links in the Bulk Upload Patients pop-up or the notification alert.
Send custom and payment-related messages to your patients
Patient Express in Clover PracticePay includes the following features:
One-way patient text messaging: Provides open-ended text functionality. If your practice has a patient’s cellphone number on file, you can send messages such as appointment reminders, readiness notifications, and follow‑up or post‑visit outreach.
Text-to-Pay: Lets you send payment requests if your practice has an Online Bill Pay site. Patients receive a text with a link to a mobile‑friendly payment page, where they can conveniently pay from their phones.
Learn about text-to-pay message limits
To comply with the Cellular Telecommunications Industry Association (CTIA) guidelines, the same patient may receive no more than one text-to-pay message per day and three per week. If you try to send a text‑to‑pay message to the same Patient ID more frequently than the daily or weekly limit, they see the message: “You have reached the limit for this number. Please try again tomorrow.”
Patient opt-in and opt-out for text messaging
Text messaging in Clover PracticePay follows FCC regulations under the Telephone Consumer Protection Act (TCPA). To stay compliant, Clover PracticePay automatically adds opt‑out instructions to every text message so patients know how to stop receiving messages.
How it works
Patient Express recognizes keywords like STOP and START to manage text‑message consent. When you send a single text message, Patient Express automatically adds: “Reply STOP to Opt‑Out.” You don’t see this line while composing your message, and it can’t be edited or removed.
If a patient replies STOP, they are automatically unsubscribed and won’t receive future texts until they reply START.
STOP response: “You are unsubscribed from messaging. No more messages will be sent. Reply START to Opt‑In.”
START response: “You are subscribed to messaging. Reply STOP to Opt‑Out.”
This ensures patients control their messaging preferences and keeps communication compliant with federal guidelines.
View report
You can view whether patients are opted in or out of text messaging in the Consent Status report. See Reports.
Send custom text messages
Patient Express provides open-ended text functionality. If your practice has a patient's cellphone number on file, you can send any type of message to the patient.
The text messaging service is one-way only. The system does not return messages to your office if a patient replies.
Prerequisites
The patient record must be added to Patient Express, and it must contain a cellphone number.
The patient must have opted to receive text messages.
Steps
Log in to Clover PracticePay.
From the left, select Patient Express.
Do one of the following:
New patient: Select Create New Patient and enter basic demographic
data for your patient, including their name and phone number.
Patient already in Patient Express: Skip to the next step.
Search for the patient using their name or Patient ID.
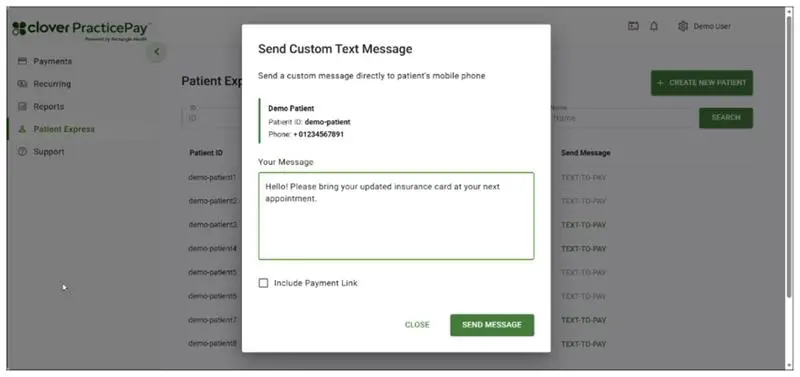
Select Text-to-Pay in the Send Message column. The Send Custom Text Message pop-up appears.
Enter your message, do not select the Include Payment Link checkbox, and then select Send Message.
Send a Text-to-Pay message
With Text-to-Pay messages, you can notify patients about their balances through text messages and share a payment link with them. Patients can pay directly from their phone using the payment link. Learn more about online payments.
The text messaging service is one-way only. The system does not return messages to your office if a patient replies.
Prerequisites
The patient record must be added to Patient Express, and it must contain a cellphone number.
The patient must have opted to receive text messages.
Steps
Log in to Clover PracticePay.
From the left, select Patient Express.
Do one of the following:
New patient: Select Create New Patient and enter basic demographic data for your patient, including their name and phone number.
Patient already in Patient Express: Skip to the next step.
Search for the patient using their name or Patient ID.
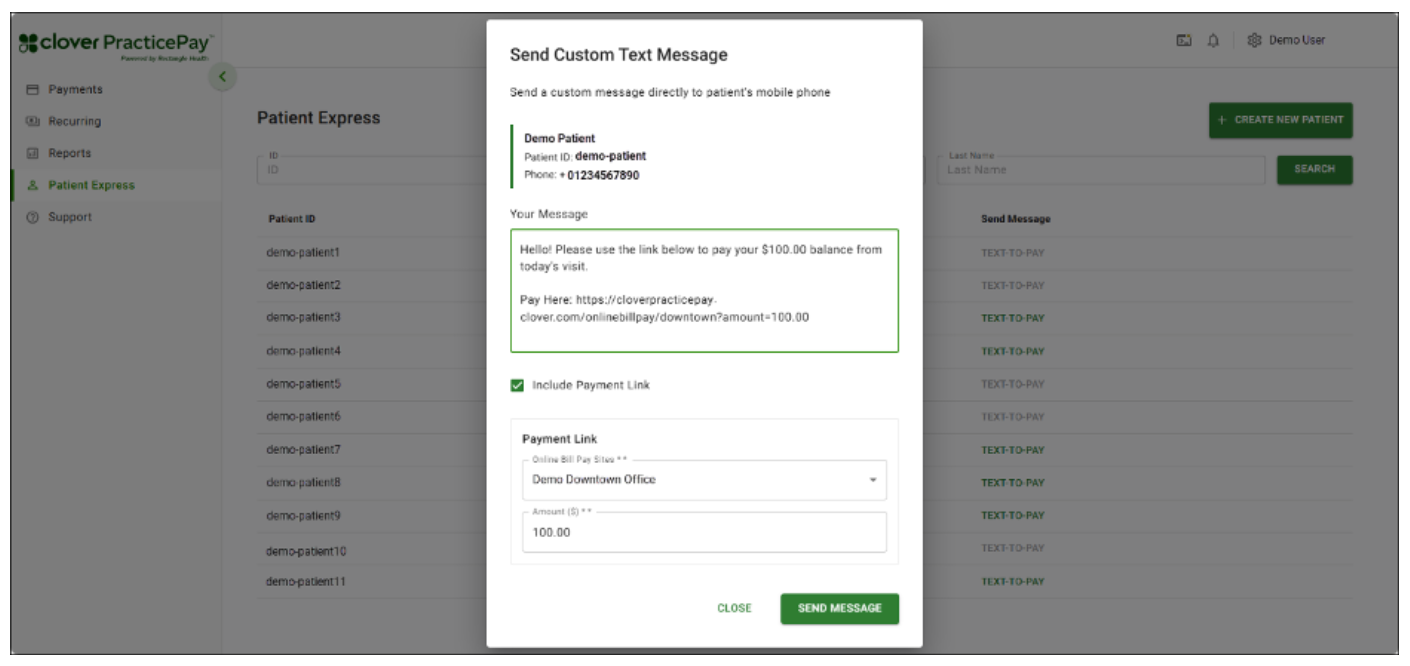
Select Text-to-Pay in the Send Message column. The Send Custom Text Message pop-up appears.
Enter your message.
Note: Include the patient’s Patient ID in the message. Patients must provide their Patient ID when making a payment on your online payment site using the link in the Text-to-Pay message.
Select the Include Payment Link checkbox.
Select your Online Bill Pay site from Online Patient Payment Sites to insert the Online Bill Pay link in the message.
In Amount ($), enter the amount due. The amount that you enter here is auto-populated in the Online Bill Pay site when the patient opens the link.
Select Send Message.
See also: Accept partial payments through Text-to-Pay.
Text-to-Pay FAQs
How do I know if I have Text-to-Pay?
If you see Patient Express in the left menu of Clover PracticePay, you already have access to Text-to-Pay.
If I currently do not have access to Text-to-Pay, how do I get access?
If you do not have Patient Express as an option in your Clover PracticePay left menu, contact your practice administrator or contact Clover Support at (855) 280-4508 (Monday–Friday, 9 AM–8 PM Eastern Time).
How can I access the Text-to-Pay feature?
Text-to-Pay is a part of Patient Express in Clover PracticePay. Select Patient Express from the left menu.
What number do the text messages come from?
A designated outbound toll-free number is designated during onboarding.
Can patients respond to messages?
Bi-directional text messaging is currently not available. Patients cannot respond to Text-to-Pay messages other than by submitting a payment using your online payment link. For further inquiries, they can call or email the office.
Can I customize the text?
Yes, Text-to-Pay messages are fully customizable.
Can I save texts as templates to send to patients?
We suggest creating a Notepad or Word document with text templates to copy and paste into the field.
Can I put the practice name in texts?
Yes, you can customize your Text-to-Pay messages with your practice name and other details.
What if I have multiple locations or doctors?
When you create a Text-to-Pay message, you will select a specific Online Bill Pay site from a drop-down list. Selecting the Online Bill Pay site for a specific location or doctor ensures the payment is routed correctly.
If you have multiple locations and use a single Online Bill Pay site for them, the responsibility is on the patient to select the correct doctor/location to which the payment is allocated to.
Do I get charged for every text sent?
Text-to-Pay messages do not incur a charge. To comply with CTIA guidelines, the same patient cannot receive more than one Text-to-Pay per day and three Text-to-Pay messages per week by default.
Where do I find the link for patients to make their payments?
When you select a specific Online Bill Pay site from the drop-down list in the message builder, it will auto-populate the text message with your unique Online Bill Pay link.
How do I know if a patient has paid?
You can track patient payments through Text-to-Pay reports, available under the Reports in the left menu of PracticePay. This report will list patients who made a payment. For more information on Text-to-Pay reports.
Do the Text-to-Pay payments post back to my practice management software?
Yes, Text-to-Pay payments appear in the Transaction Search report as Online Bill Pays. You can post them to your Practice Management System (PMS) by selecting Post in the Transaction Search results or by selecting Post on the Transaction Details screen. See how to post payments.
For questions about getting started with Text-to-Pay, contact Clover Support at (855) 280-4508 (Monday–Friday, 9 AM–8 PM Eastern Time).
Can Text-to-Pay messages be sent via email?
No, email is not a supported messaging method for Text-to-Pay, as text message delivery has proven to be more effective.