Manage payments and transactions
Payments and transactions
This topic covers all the ways you can accept payments from your patients: card, card-on-file, cash, or recurring. It includes common errors and how to troubleshoot them, and frequently asked questions.
Before you begin
Locate your Merchant ID
To locate your Merchant ID for your Clover PracticePay account, refer to your monthly merchant statement. Your Merchant ID is in the upper right-hand corner of the statement. If you do not have access to the statement, you may also find your Merchant ID in your Merchant Services Agreement, which was provided during the onboarding of your account.
Configure email notifications for payment activities
Clover PracticePay can alert you by email when specific payment activities occur. Clover Support configures these notifications, including enabling the feature and updating recipient email addresses.
Examples include:
Payments received through an Online Bill Pay link, including website links or a Text-to-Pay link sent from Patient Express.
Payments received for a recurring payment plan.
To enable these notifications or update recipients, contact Clover Support at (855) 280-4508 (Monday–Friday, 9 AM–8 PM Eastern Time).
Take card-present payments
A card‑present payment is initiated on the Clover PracticePay screen before the cardholder interacts with the Clover device. In addition to standard card payments, Clover devices also accept Apple Pay®, Google Pay™, and Samsung Pay® for card‑present transactions.
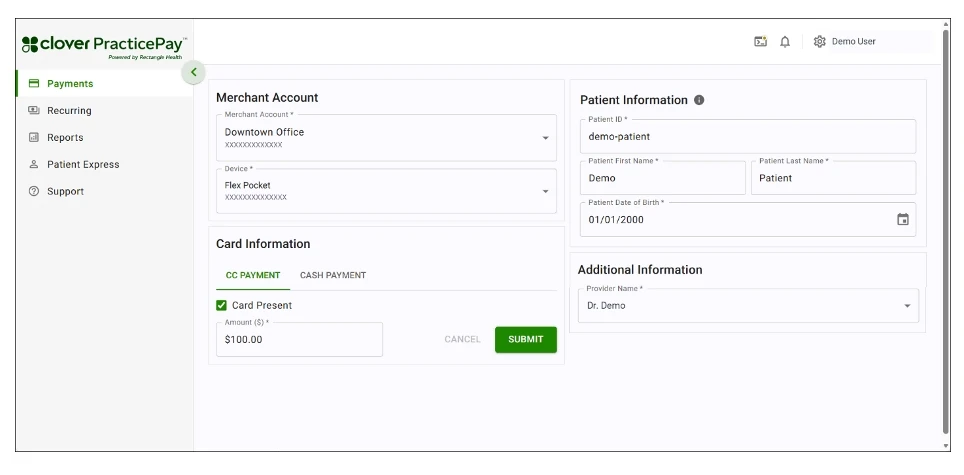
1. Log in to Clover PracticePay. 2. From the left, select Payments.
3. In the Merchant Account section:
If you have more than one location, select your Merchant Account ID and the location you want to use.
If you have multiple Clover devices, select a Device to process the transaction.
4. In the Card Information section, on the CC Payment tab, select the Card Present checkbox.
5. In Amount ($), enter the amount for the payment.
6. Do one of the following:
Search for an existing patient record in Patient Express by entering the patient ID or name, or select a patient name.
Add a new patient if a record is not available in Patient Express.
Tip: Enter two spaces in the Search Patient field for the Add New Patient button.
7. (Optional) Enter additional information.
Note:
If you have any Merchant Defined Fields (MDFs), which are custom fields that allow you to track additional information on the transaction, they appear under the Additional Information section.
8. Select Submit.
Add new patient
In the Patient Information section, select Add New Patient.
Enter patient details in the Add New Patient pop-up:
Patient ID (required)—Use the same Patient ID that appears elsewhere in Clover PracticePay. As a best practice, use the same ID assigned to the patient in your practice management system (PMS) or electronic medical record (EMR) to maintain consistency across systems.
First Name (required)
Last Name (required)
Date of Birth (optional)
Phone Number (optional)—Enter a mobile number to send Text-to-Pay and custom text messages. As a best practice, enter a mobile number rather than a landline, as landlines cannot receive text messages.
Email Address (optional)
Primary Merchant Account (required)
Select Add Patient. Their information is available in the Patient Information section and the Merchant Account field.
Take payment
1. The cardholder pays by swiping, inserting, or tapping their card on the Clover device, and provides a signature on the device when prompted.
2. If using tap‑to‑pay, the card may need to be held in place for 2–3 seconds. A successful tap is typically confirmed by a beep, green light, or message.
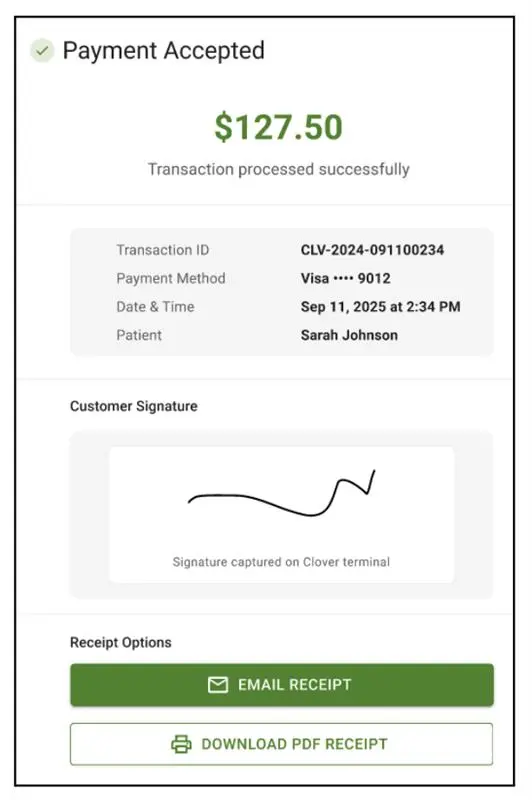
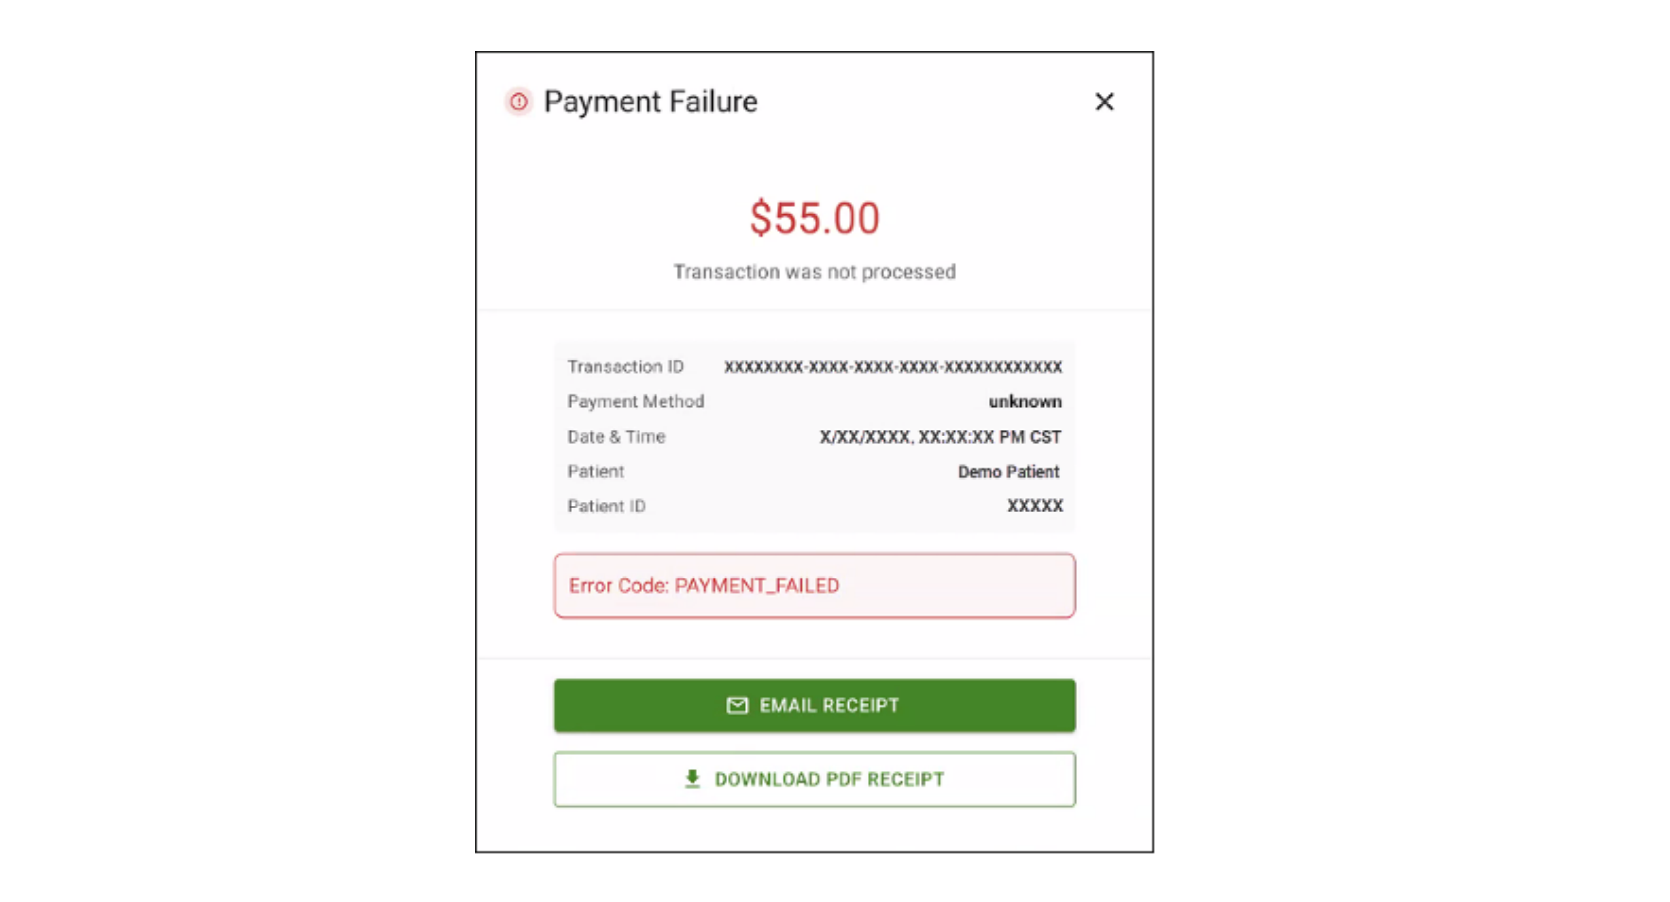
3. A pop-up indicates Payment Accepted or Payment Declined. The Payment Declined pop-up displays an error code that explains why the payment was declined.
4. If payment is accepted, select how to provide the customer with a receipt. You can complete one, some, or all of the options.
Take card-present partial payments
The Partial Payment setting is enabled by default and lets you accept partial card-present payments on the Payments page. In addition to standard card payments, Clover devices also accept Apple Pay®, Google Pay™, and Samsung Pay® for card‑present transactions.
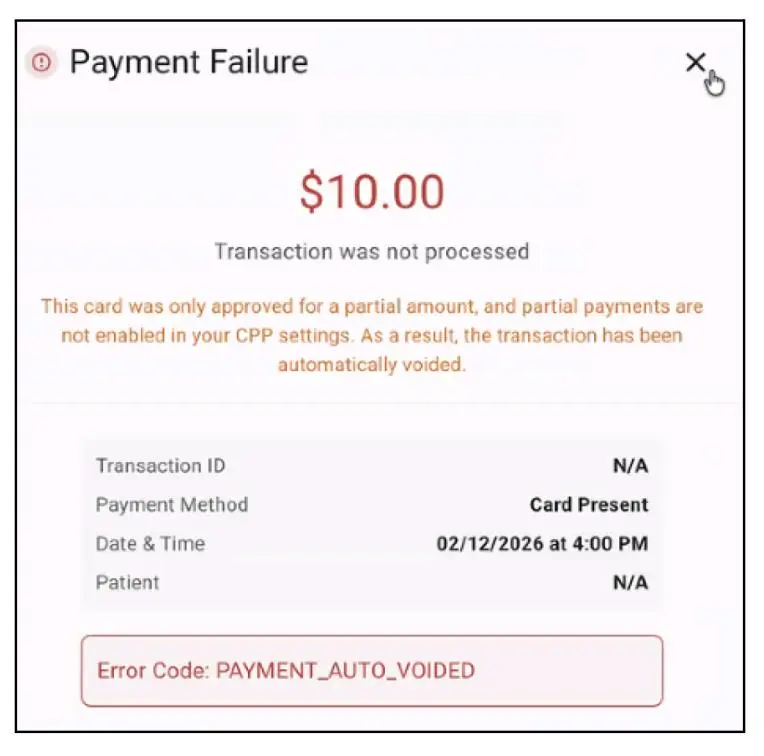
Note: If the Partial Payment setting is not enabled, any processed partial payment is immediately voided because your settings require full payments. To update this setting, contact Clover Support at (855) 280‑4508 (Monday–Friday, 9 AM–8 PM ET).
To take card-present partial payments:
1. Log in to Clover PracticePay.
2. From the left, select Payments.
3. In the Merchant Account section:
If you have more than one location, select your Merchant Account ID and the location you want to use.
If you have multiple Clover devices, select a Device to process the transaction.
4. In the Card Information section, on the CC Payment tab, select the Card Present checkbox.
5. In Amount ($), enter the amount for the payment.
6. Do one of the following:
Search for an existing patient record in Patient Express by entering the patient ID or name, or select a patient name.
Add a new patient if a record is not available in Patient Express. Tip: Enter two spaces in the Search Patient field for the Add New Patient button.
7. (Optional) Enter additional Information.
Note:
If you have any Merchant Defined Fields (MDFs), which are custom fields that allow you to track additional information on the transaction, they appear under the Additional Information section.
8. Select Submit.
Add a new patient
In the Patient Information section, select Add New Patient.
Enter patient details in the Add New Patient pop-up:
Patient ID (required)—Use the same Patient ID that appears elsewhere in Clover PracticePay. As a best practice, use the same ID assigned to the patient in your practice management system (PMS) or electronic medical record (EMR) to maintain consistency across systems.
First Name (required)
Last Name (required)
Date of Birth (required)
Phone Number (optional)—Enter a mobile number to send Text-to-Pay and custom text messages. As a best practice, enter a mobile number rather than a landline, as landlines cannot receive text messages.
Email Address (optional)
Primary Merchant Account (required)
Select Add Patient. Their information is available in the Patient Information section and the Merchant Account field.
Take payment
1. The cardholder pays by swiping, inserting, or tapping their card on the Clover device, and provides a signature on the device when prompted.
2. If using tap‑to‑pay, the card may need to be held in place for 2–3 seconds. A successful tap is typically confirmed by a beep, green light, or message.
3. If the card does not cover the full amount, a Remaining Balance screen appears. The cardholder can tap:
Cancel to void the payment.
Continue to accept partial payment and pay the remainder using another method.
Scenario 1: If the cardholder taps Cancel
1. A transaction has been voided screen appears, and then the full balance due is displayed on the Clover device.
2. The cardholder can select another card to tap, insert, or swipe, or tap the X button.
If the cardholder pays with another card, a pop-up indicates Payment Accepted or Payment Declined. If payment is accepted, select how to provide the customer with a receipt. You can complete one, some, or all of the options.
If the cardholder taps X, the payment is cancelled, and a Payment Failure pop-up appears. You need to initiate another payment.
Scenario 2: If the cardholder taps Continue
1. The Signature screen appears on the Clover device.
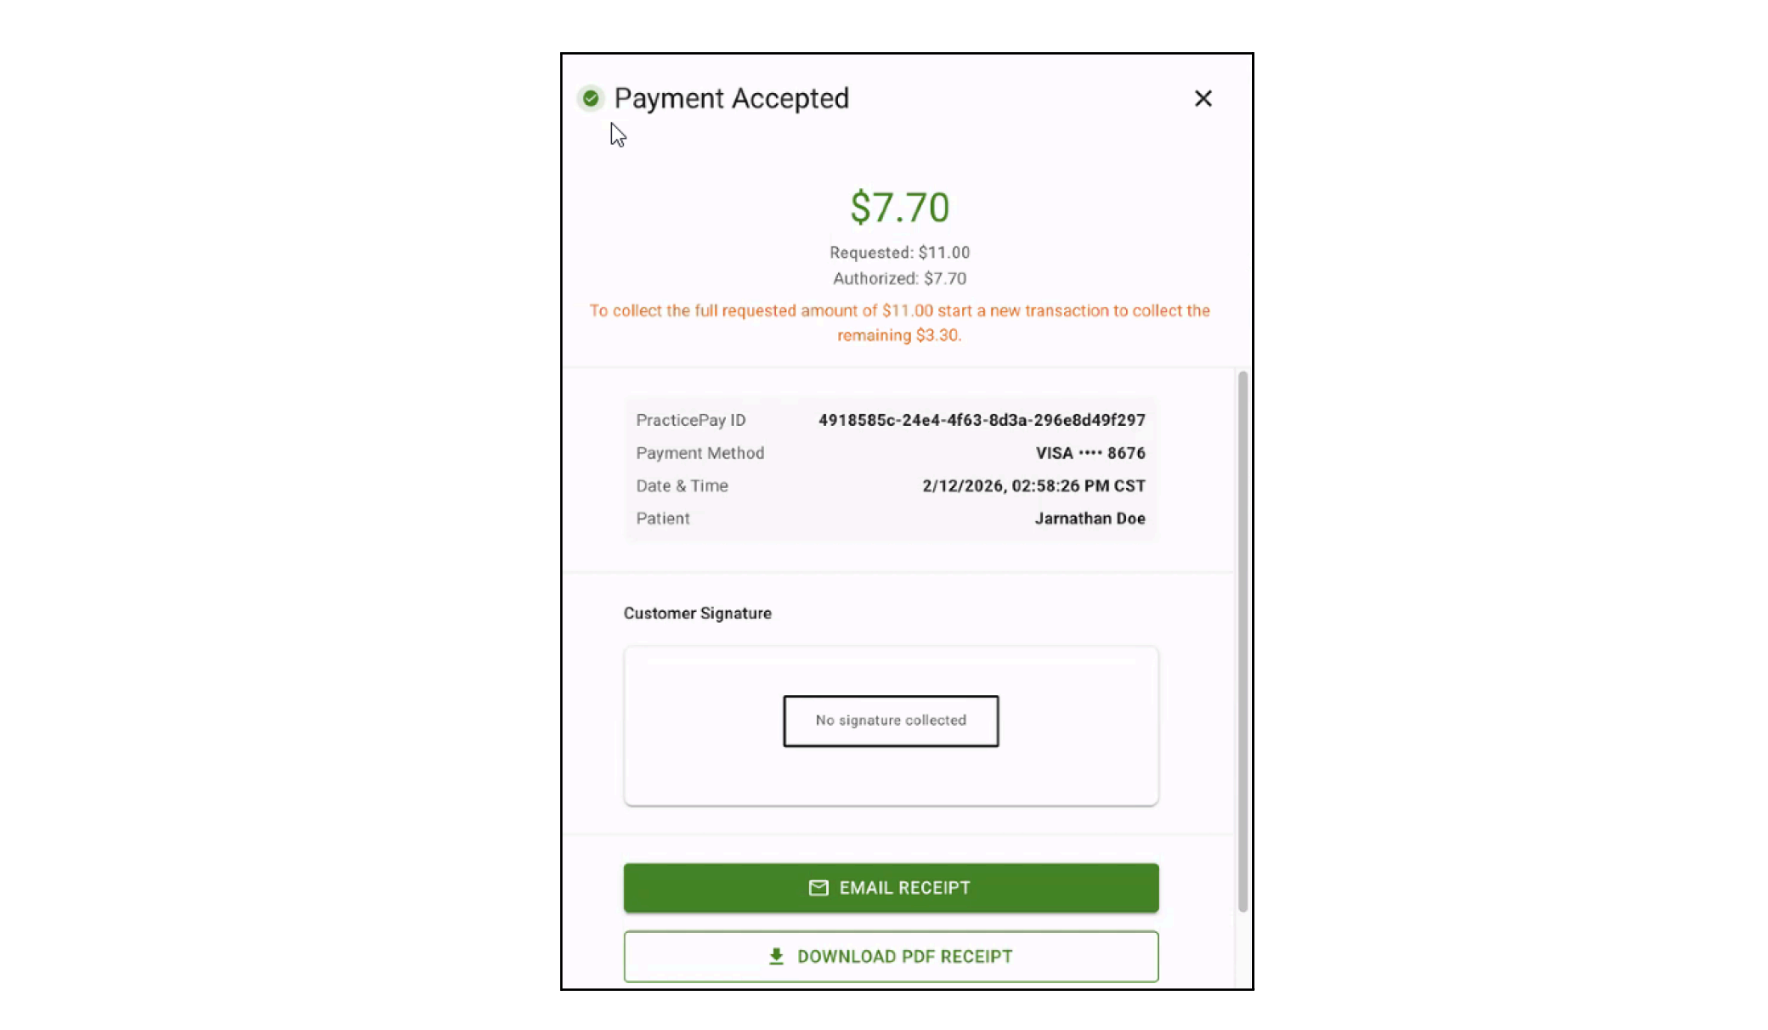
2. The cardholder signs and taps Done. A Payment Accepted pop‑up appears for the partial amount paid.
3. Select how to provide the customer with a receipt. You can complete one, some, or all of the options.

4. To collect the remaining balance due, start a new transaction with the steps to take card-present partial payments.
Take card-not-present payments
You can use the Payments page to take card‑not‑present payments. The following payment methods are not available for card‑not‑present transactions: Apple Pay®, Google Pay™, and Samsung Pay®. These options are only supported for card‑present payments on Clover devices.
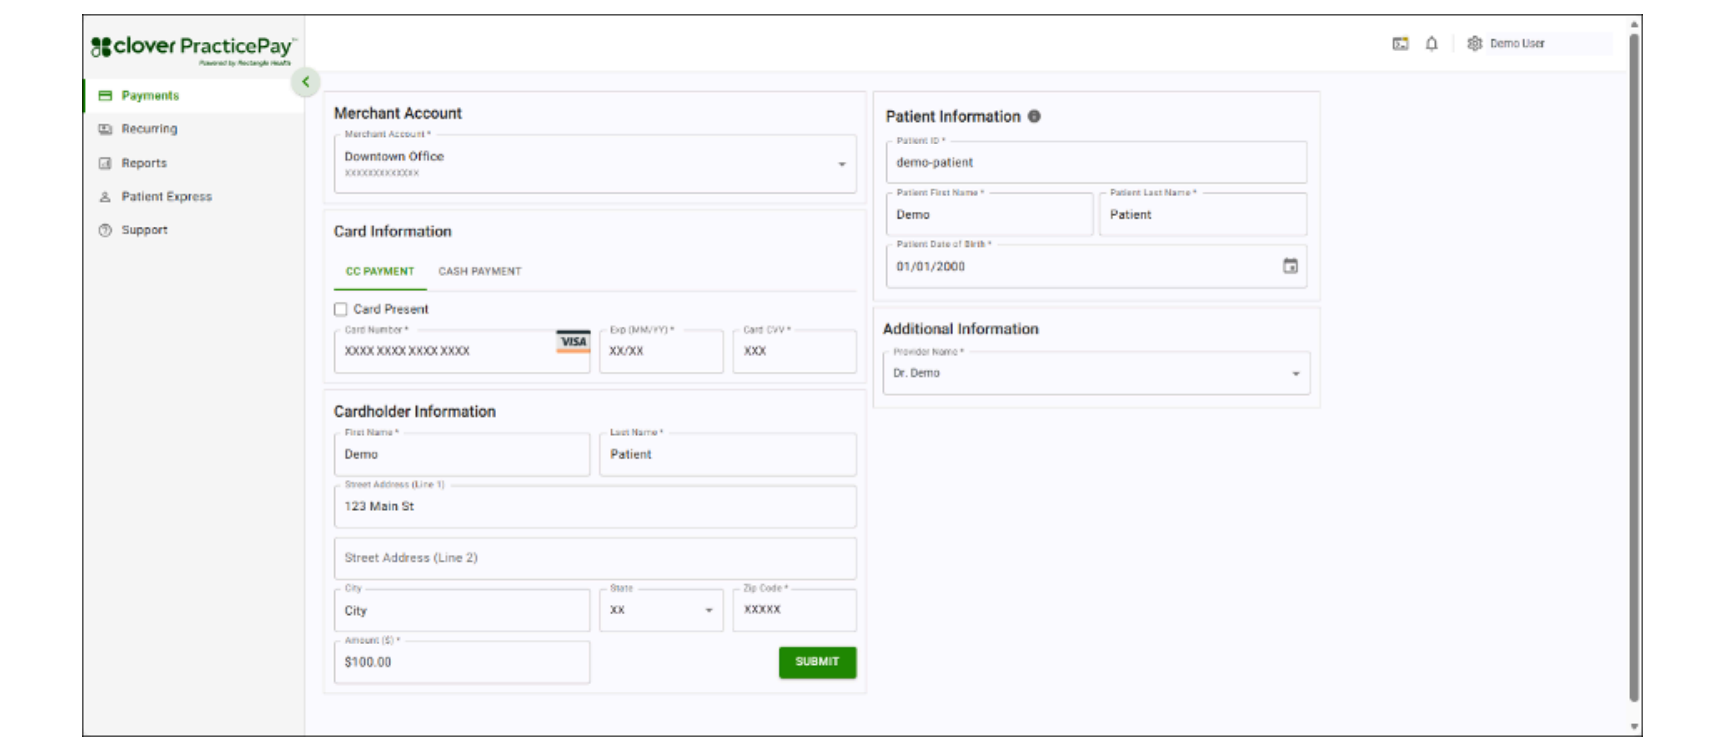
1. Log in to Clover PracticePay.
2. From the left, select Payments.
3. In the Merchant Account section, if you have more than one location, select your Merchant Account ID and the location you want to use.
4. In the Card Information section, on the CC Payment tab, enter the card number, expiration date, and CVV number.
5. In the Cardholder Information section, enter the cardholder's last name and first name. Address information may be required or optional, depending on your configurations. If it is optional, capturing this information can help protect you in the event of a chargeback.
6. In Amount ($), enter the amount for the payment.
7. Do one of the following:
Search for an existing patient record in Patient Express by entering the patient ID or name, or select a patient name.
Add a new patient if a record is not available in Patient Express. Tip: Enter two spaces in the Search Patient field for the Add New Patient button.
8. (Optional) Enter additional Information.
Note:
If you have any Merchant Defined Fields (MDFs), which are custom fields that allow you to track additional information on the transaction, they appear under the Additional Information section.
9. Select Submit.
10. On the Payment Accepted pop-up, choose how to provide the customer with a receipt. You can complete one, some, or all of the options.
Add new patient
In the Patient Information section, select Add New Patient.
Enter patient details in the Add New Patient pop-up:
Patient ID (required)—Use the same Patient ID that appears elsewhere in Clover PracticePay. As a best practice, use the same ID assigned to the patient in your practice management system (PMS) or electronic medical record (EMR) to maintain consistency across systems.
First Name (required)
Last Name (required)
Date of Birth (required)
Phone Number (optional)—Enter a mobile number to send Text-to-Pay and custom text messages. As a best practice, enter a mobile number rather than a landline, as landlines cannot receive text messages.
Email Address (optional)
Primary Merchant Account (required)
Select Add Patient. Their information is available in the Patient Information section and the Merchant Account field.
Take card-not-present partial payments
The Partial Payment setting is enabled by default and lets you accept partial card-not-present payments on the Payments page. The following payment methods are not available for card‑not‑present transactions: Apple Pay®, Google Pay™, and Samsung Pay®. These options are only supported for card‑present payments on Clover devices.
Note: If you do not have the Partial Payment setting enabled, a processed partial payment is immediately voided because your settings are for full payments.
If you want to change this, Clover Support at (855) 280-4508 (Monday–Friday, 9 AM–8 PM Eastern Time).
To take card-not-present partial payments:
1. Log in to Clover PracticePay.
2. From the left, select Payments.
3. In the Merchant Account section, if you have more than one location, select your Merchant Account ID and the location you want to use.
4. In the Card Information section, on the CC Payment tab, enter the card number, expiration date, and CVV number.
5. In the Cardholder Information section, enter the cardholder's last name and first name. Address information may be required or optional, depending on your configurations. If it is optional, capturing this information can help protect you in the event of a chargeback.
6. In Amount ($), enter the amount for the payment.
7. Do one of the following:
Search for an existing patient record in Patient Express by entering the patient ID or name, or select a patient name.
Add a new patient if a record is not available in Patient Express. Tip: Enter two spaces in the Search Patient field for the Add New Patient button.
8. (Optional) Enter additional Information.
Note:
If you have any Merchant Defined Fields (MDFs), which are custom fields that allow you to track additional information on the transaction, they appear under the Additional Information section.
9. Select Submit. A Payment Accepted pop-up indicates that only a partial amount was paid.
10. On the Payment Accepted pop-up, choose how to provide the customer with a receipt. You can complete one, some, or all of the options.
11. To collect the remaining balance due, start a new transaction with the steps to take card-not-present partial payments.
Add new patient
In the Patient Information section, select Add New Patient.
Enter patient details in the Add New Patient pop-up:
Patient ID (required)—Use the same Patient ID that appears elsewhere in Clover PracticePay. As a best practice, use the same ID assigned to the patient in your practice management system (PMS) or electronic medical record (EMR) to maintain consistency across systems.
First Name (required)
Last Name (required)
Date of Birth (required)
Phone Number (optional)—Enter a mobile number to send Text-to-Pay and custom text messages. As a best practice, enter a mobile number rather than a landline, as landlines cannot receive text messages.
Email Address (optional)
Primary Merchant Account (required)
Select Add Patient. Their information is available in the Patient Information section and the Merchant Account field.
Take cash payments
1. Log in to Clover PracticePay.
2. From the left, select Payments.
3. In the Merchant Account section, if you have more than one location, select your Merchant Account ID and the location you want to use.
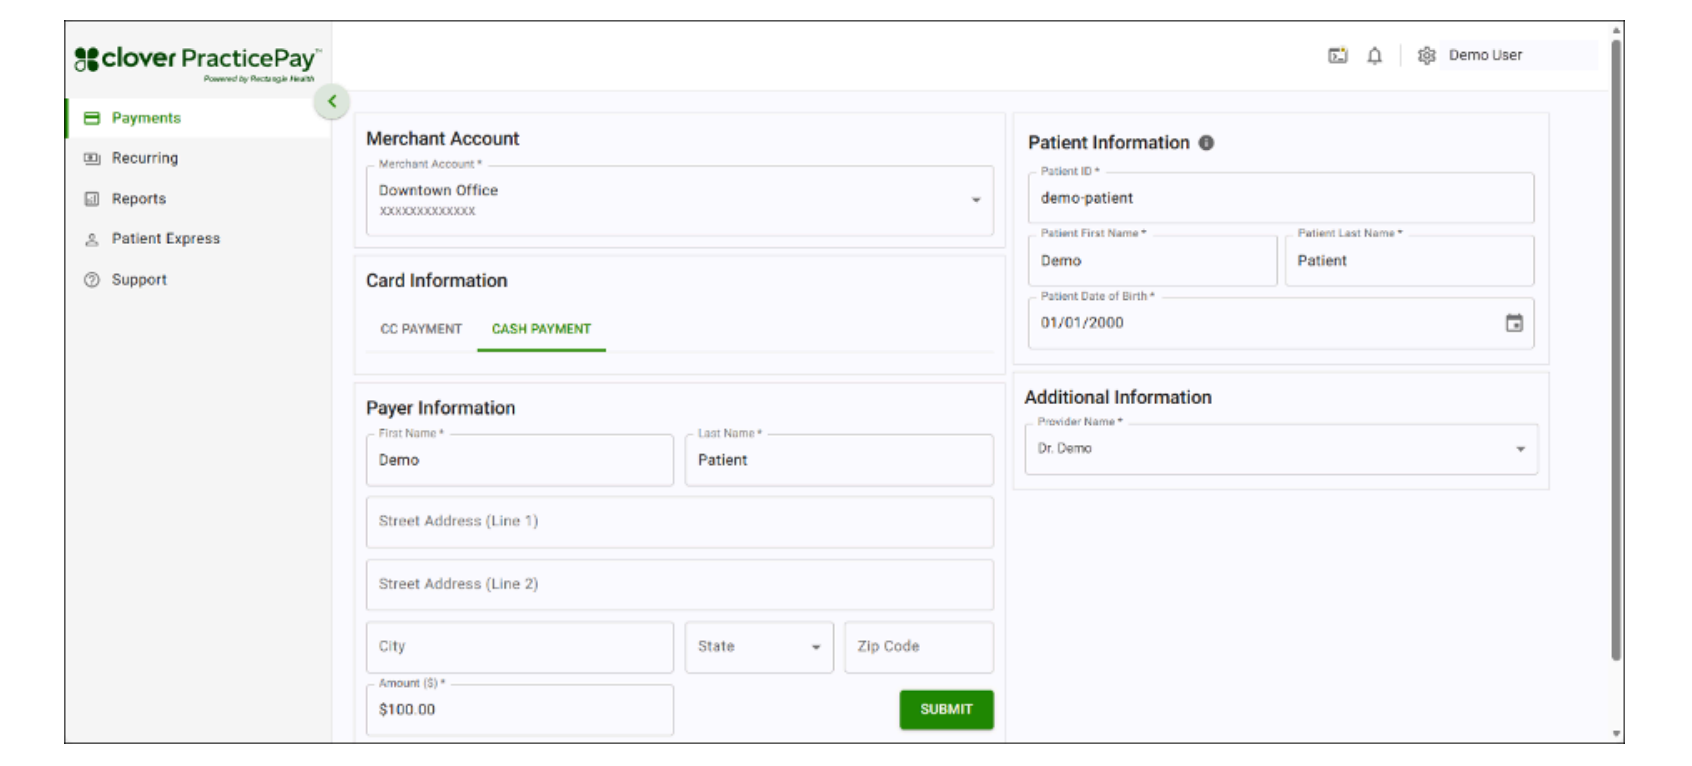
4. In the Card Information section, select the Cash Payment tab.
5. Enter information in the Payer Information, including first and last name, and the address.
6. In Amount ($), enter the amount for the payment.
7. Do one of the following:
Search for an existing patient record in Patient Express by entering the patient ID or name, or select a patient name.
Add a new patient if a record is not available in Patient Express. Tip: Enter two spaces in the Search Patient field for the Add New Patient button.
8. (Optional) Enter additional Information.
Note:
If you have any Merchant Defined Fields (MDFs), which are custom fields that allow you to track additional information on the transaction, they appear under the Additional Information section.
9. Select Submit.
10. On the Payment Accepted pop-up, choose how to provide the customer with a receipt. You can complete one, some, or all of the options.
Add new patient
In the Patient Information section, select Add New Patient.
Enter patient details in the Add New Patient pop-up:
Patient ID (required)—Use the same Patient ID that appears elsewhere in Clover PracticePay. As a best practice, use the same ID assigned to the patient in your practice management system (PMS) or electronic medical record (EMR) to maintain consistency across systems.
First Name (required)
Last Name (required)
Date of Birth (optional)
Phone Number (optional)—Enter a mobile number to send Text-to-Pay and custom text messages. As a best practice, enter a mobile number rather than a landline, as landlines cannot receive text messages.
Email Address (optional)
Primary Merchant Account (required)
Select Add Patient. Their information is available in the Patient Information section and the Merchant Account field.
Take payments with Virtual Credit Card
If your practice receives Virtual Credit Card (VCC) claims payments, you can use Clover PracticePay to charge and track them. These one-time-use virtual cards are considered a ‘bundled’ payment method, with a single VCC that may represent payment for multiple patients or, in some cases, a single patient. Tracking, reporting, or processing single-patient VCC payments may vary depending on your bookkeeper’s preferences.
How it works
Add a VCC payer: We recommend creating patient records for these payers in Patient Express. You can add a VCC claims payment payer in one of two ways:
Directly in Patient Express before taking a payment. Learn how to manage patient information.
While taking a payment for the first time, by adding a new patient.
Accept and charge the VCC: You can use the payer’s Patient Express record on the Payments screen to accept payments and charge the VCC, so the full receivable amount settles into your bank account. After payment, you need to manually update each patient’s ledger in your practice management system (PMS) to reflect their portion of the bundled VCC payment.
Track VCC transactions: To track VCC transactions, filter by the payer’s Patient ID in Reports > Transaction Search to view all VCC payments attributed to that payer.
Before you begin
Determine the Virtual Credit Card (VCC) ZIP code, as it is required to process a VCC payment. VCC ZIP codes can vary by payer. Payers may:
Use their own ZIP code.
Use the ZIP code associated with the claims submission associated with the payment.
Issue a ZIP code that is included in the information accompanying the VCC. Example: A payer’s VCCs may have the ZIP code located on your card mailer.
For help determining the correct ZIP code, contact the payer who issued the VCC.
Steps
Log in to Clover PracticePay.
From the left, select Payments.
In the Merchant Account section, if you have more than one location, select your Merchant Account ID and the location you want to use.
In the Card Information section, on the CC Payment tab, enter the card number, expiration date, and CVV number.
In the Cardholder Information section, enter the cardholder's last name and first name. Address information may be required or optional, depending on your configurations. If it is optional, capturing this information can help protect you in the event of a chargeback.
Enter the dollar amount for the payment.
Do one of the following:
Search for an existing patient record in Patient Express by entering the patient ID or name, or select a patient name.
Add a new patient if a record is not available in Patient Express.
Tip: Enter two spaces in the Search Patient field for the Add New Patient button.
(Optional) Enter additional Information.
Note: If you have any Merchant Defined Fields (MDFs), which are custom fields that allow you to track additional information on the transaction, they appear under the Additional Information section.
Select Submit. A Payment Accepted pop-up indicates that only a partial amount was paid.
On the Payment Accepted pop-up, choose how to provide the customer with a receipt. You can complete one, some, or all of the options.
Add new patient
In the Patient Information section, select Add New Patient.
Enter patient details in the Add New Patient pop-up:
Patient ID (required)—Use the insurance’s name, Payer ID, or other indicator. Use the same Patient ID that appears elsewhere in Clover PracticePay. As a best practice, use the same ID assigned to the patient in your practice management system (PMS) or electronic medical record (EMR) to maintain consistency across systems.
First Name (required)—Enter the payer’s company name.
Last Name (required)—Enter the payer’s company name.
Date of Birth (optional)
Phone Number (optional)
Email Address (optional)
Primary Merchant Account (required)
Select Add Patient. Their information is available in the Patient Information section and the Merchant Account field.
Provide payment receipts
Email receipt
1. Select the Email Receipt option.
2. Enter the recipient email address or addresses. Separate multiple emails with commas.
(Optional) For multiple recipients, select Add Another Email.
4. (Optional) Add a custom message above the default “Do-Not-Reply” text.
5. Select Send. A confirmation message appears once the email is delivered.
Download PDF receipt
1. Select the Download PDF Receipt option to download a PDF file to your computer.
2. (Optional) If needed, open the PDF and print it or save it in another location on your computer for record-keeping.
Print to Clover device
Select Print to Clover Device to print a physical receipt with basic transaction details. A confirmation message appears after successful printing.
Provide payment receipts at a later time
You can send receipts through email or download PDF receipts at any point after a transaction has taken place. If you email a receipt or download a PDF receipt during the transaction, you can use this process to re-print or resend the receipt via email.
From the left, select Reports > Transaction Search.
Enter search information in the Transaction Search field and select Submit.
Locate the transaction in the Search Results and select the link in the Clover Payment Id column.
On the Transaction Details pop-up, select Receipt.
On the Transaction Receipt pop-up, choose how to provide the customer with a receipt. You can complete one, some, or all of the options.
Update patient receipt information
Update information on your patient receipts
To update the address, phone number, or any other information on your patient receipts, contact Clover Support at (855) 280-4508 (Monday–Friday, 9 AM–8 PM Eastern Time) and have the updated details ready.
Add your logo to your patient receipts
To add your logo to your patient receipts, contact Clover Support. During the call, a support representative will email you. Reply to that email with your logo file attached, and do not change the email subject line. Before calling, make sure you have your logo ready in JPEG or PNG format.
Update settlement batch time
Throughout the day, transactions are authorized but not yet settled. Once a batch is settled, the bank can transfer the funds to the bank account you have on file.
Batching occurs in 25‑minute increments, and the batch settlement time can be adjusted to ensure you capture some or all of a day’s transactions.
To adjust your batch settlement time, contact Clover Support.
Understand declined payment responses
If a payment is declined, a Payment Declined pop-up appears with a red error code indicating “Transaction was not processed”. The error code 209: Failure results from the cardholder selecting the cancel button on the Clover device.
Refund or void a payment
You can void payments prior to settlement and refund payments after settlement. Refunds can only be applied to the original card used.
You can only refund the transaction once it has settled.
You can void the transaction if it has not settled yet. The Void button is only available for 25 minutes after the transaction is completed.
You can only refund and not void cash transactions.
Prerequisite
You must have the access setting assigned to issue refunds or voids. If you do not see the option to issue refunds or voids in Clover PracticePay, contact your practice administrator.
Steps
1. Log in to Clover PracticePay.
2. From the left, select Reports > Transaction Search.
3. Apply search filters in Transaction Search, and then select Search.
4. Locate the transaction in the search results, and then select the Payment ID link in the Payment ID column.
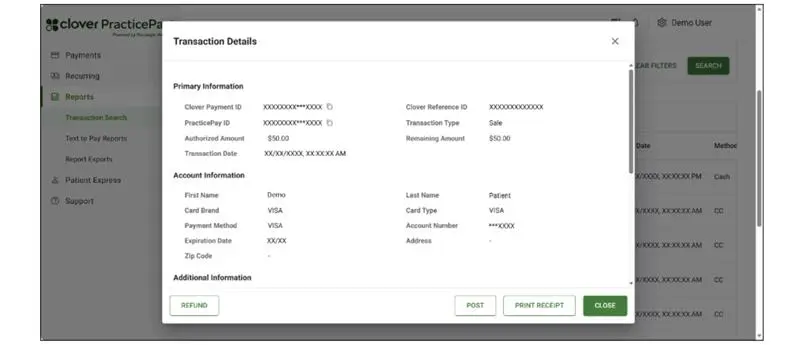
5. Select Refund at the bottom of the Transaction Details pop-up.
Note: The Void button appears if the transaction has not settled yet and is available for 25 minutes after the transaction was made. If you select Void, skip the following refund-related steps.
6. On Confirm Refund Amount:
To issue a full refund, leave the full amount.
To issue a partial refund, enter a lower amount.
7. Select Submit to issue the full or partial refund.
8. One of the following messages appears:
Refund Successful: Displays refund details and provides Receipt and Close buttons. Select Receipt to share a refund receipt.
Refund Processing Failed: Displays an error code and details about the failed refund, along with a Close button.